Deploying Meshery Designs
Introduction
Deploying Meshery designs is a common and essential task for managing your infrastructure and workloads. Having a thorough understanding of this procedure and Meshery’s design deployment behavior is key to ensuring that your component configurations work as intended in a live Kubernetes environment. Meshery’s design deployment process not only attests to the validity of your configuration, but also offers a seamless transition from Designer mode to Visualizer mode, where you can visually inspect your deployment, and begin to manage live-running deployments in your environment.
Meshery’s deployment process encompasses four steps: validation, dry-run, environment selection, and finally, executing the deployment itself.
This chapter guides you through each of these four steps. Along the way, you will learn what a successful step looks like, understand common failure scenarios, and go through strategies for troubleshooting and resolving any issues that might arise. Additionally, you will learn about Meshery’s Notification Center and how to best use it to your advantage.
Prerequisites
Ensure you have one or more Meshery designs available.
Access to Meshery (Self-Hosted or Meshery Playground).
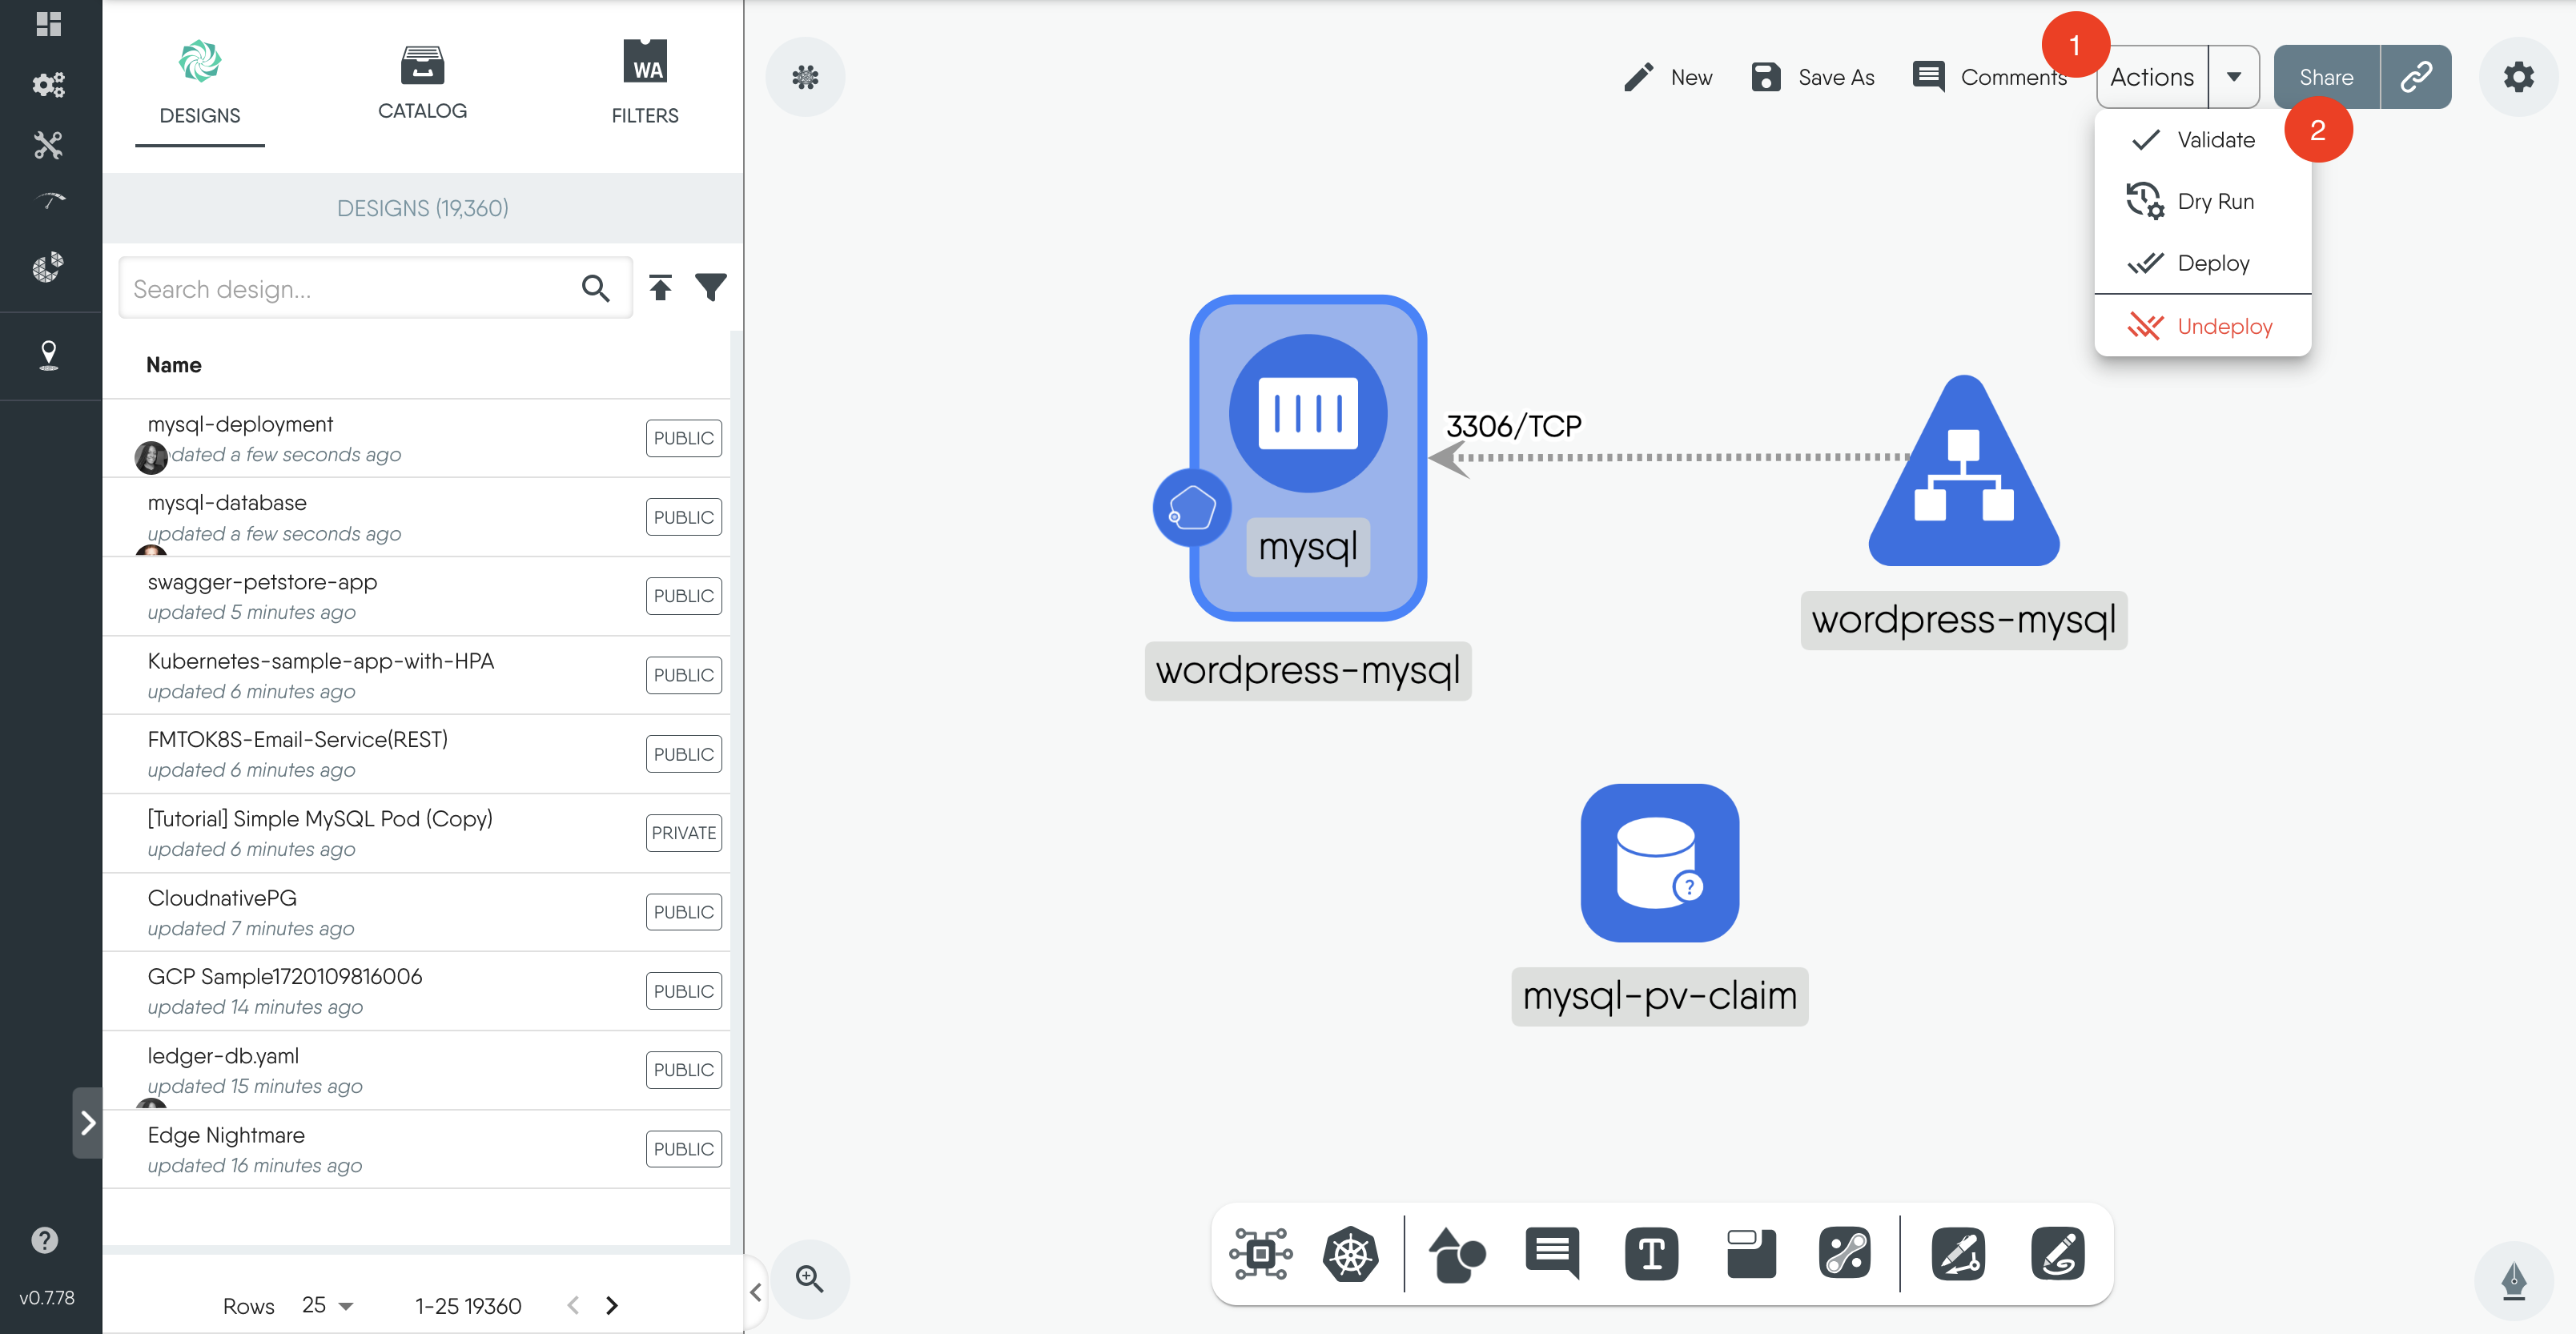
Action Button
There are two modes on the Actions button:
Clicking on the word Actions presents a set of choices, each labeled with its respective action. Selecting an option opens a modal window, providing detailed guidance.
Clicking on the Action drop-down icon reveals a list of icons. Selecting an icon allows seasoned users to perform actions with a single click, bypassing the modal interaction.
In this chapter, we focus on utilizing the first option to provide a comprehensive view of the deployment process.

Design Validation
Validation is the first step in deploying designs with Meshery. While optional, it is highly recommended as it helps identify and resolve possible misconfigurations upfront.
How Validation Works
Meshery uses static analysis to verify your design. It checks all components within your design and all configured and unconfigured properties of your components against well-defined schemas based on Meshery Models.
This comprehensive validation ensures that:
- The design adheres to the expected structure and format.
- All components are valid and recognized by Meshery.
- There are no missing required configurations.
Performing Validation
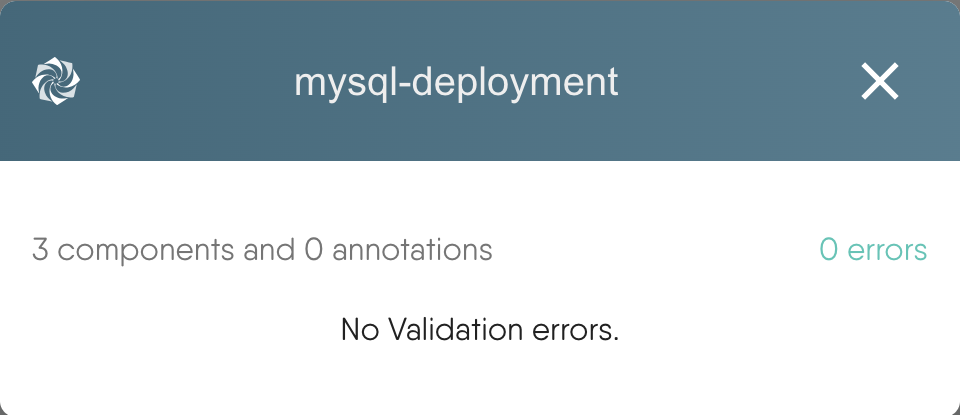
To validate your design, navigate to the Actions button at the top of the Design canvas.
Click on the Validate Icon.
If the validation is successful, you will see a modal displaying the number of components validated and the number of annotations, similar to the one shown below:
{" "}
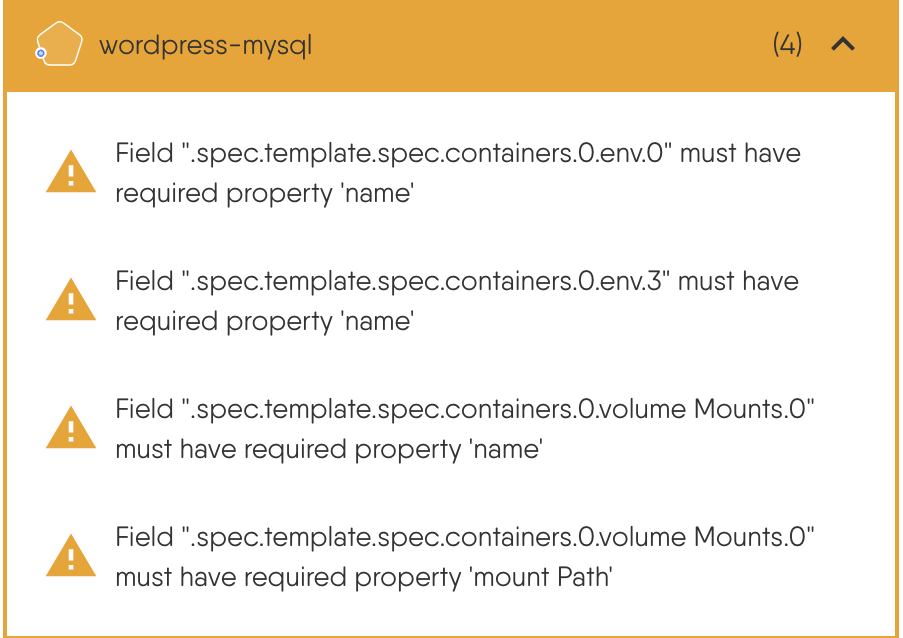
Handling Validation Errors
If your design fails validation checks, the modal will indicate the number of errors detected. Each error will provide specific information about the component or annotation that caused the failure. Use this detailed feedback to identify and correct the issues in your design before proceeding with the deployment.
Validation Errors
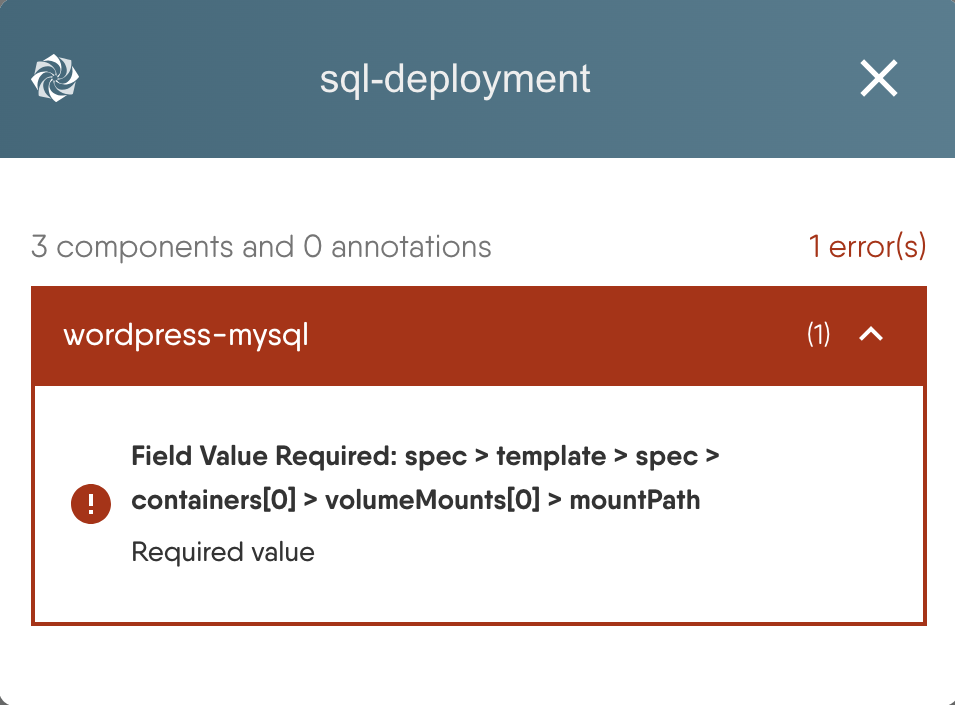
A common validation error is:
Missing Required Field: This happens when a required field is not provided. For example, in the image below, the first error indicates that the field ".spec.template.spec.containers.0.env.0" must have a value.
To troubleshoot and remediate validation issues:
- Click on the error on the modal.
- This will open the configuration tab of the component that has that error.
- Fix the configuration using the error details provided.
- Re-run validation after any significant changes to your design to ensure all issues are resolved.
The validation process is confined to schema-based checks within Meshery and does not require communication with your target environment. The Dry Run step, however, does involve this communication. Let’s explore the Dry Run step next.
Design Dry Run
A dry run in Meshery simulates the deployment of your design in the selected target environment without making any actual changes. This step is highly beneficial as it helps identify potential issues before they occur, ensuring a smoother and more reliable deployment process.
Performing Dry Run
Navigate to the Actions button at the top of the Design canvas.
Click on the Dry Run icon.
Review the results to identify any potential issues.
Make necessary adjustments to your configuration based on the feedback provided by the dry run.
Re-run the dry run to ensure all issues have been resolved.
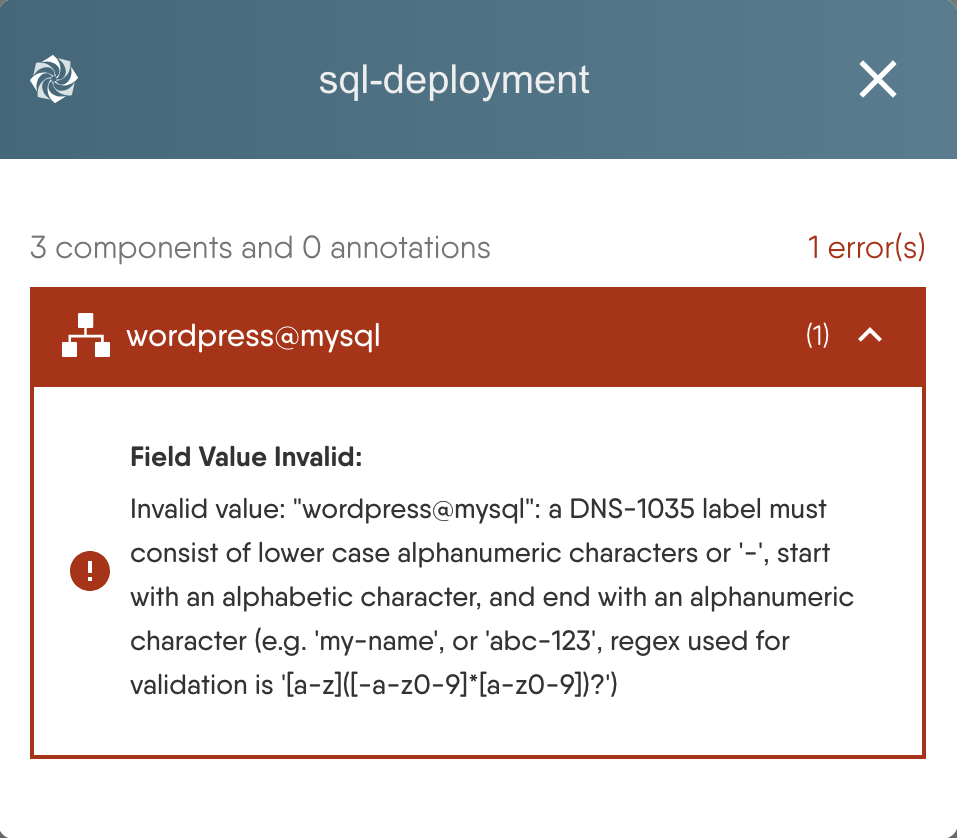
Examples of Dry Run Errors
Some examples of dry run errors are:
Invalid Field Value: The error message indicates that a field has an invalid value. For instance, in the image below, the fields "spec > ports[0] > port" and "spec > ports[0] > targetPort" have invalid values of 0. These values must be between 1 and 65535, inclusive.
Missing Required Field
Missing Dependencies: In this case, the error occurs because a Kubernetes Custom Resource Definition (CRD) should have been deployed first before attempting to deploy this component.
To resolve this, ensure that all necessary dependencies, such as CRDs, are deployed before deploying the components that rely on them.

Environment Selection
Meshery Environments are logical groups of Connections which include GitHub integrations, Prometheus connections, and Kubernetes Clusters and so on managed by Meshery. To make your Kubernetes connections available for selection, you need to assign them to an environment and link that environment to your current workspace. Note: Environments can be assigned to one or more Workspaces.
Adding an Environment During Deployment
During deployment, you will be required to select an environment.
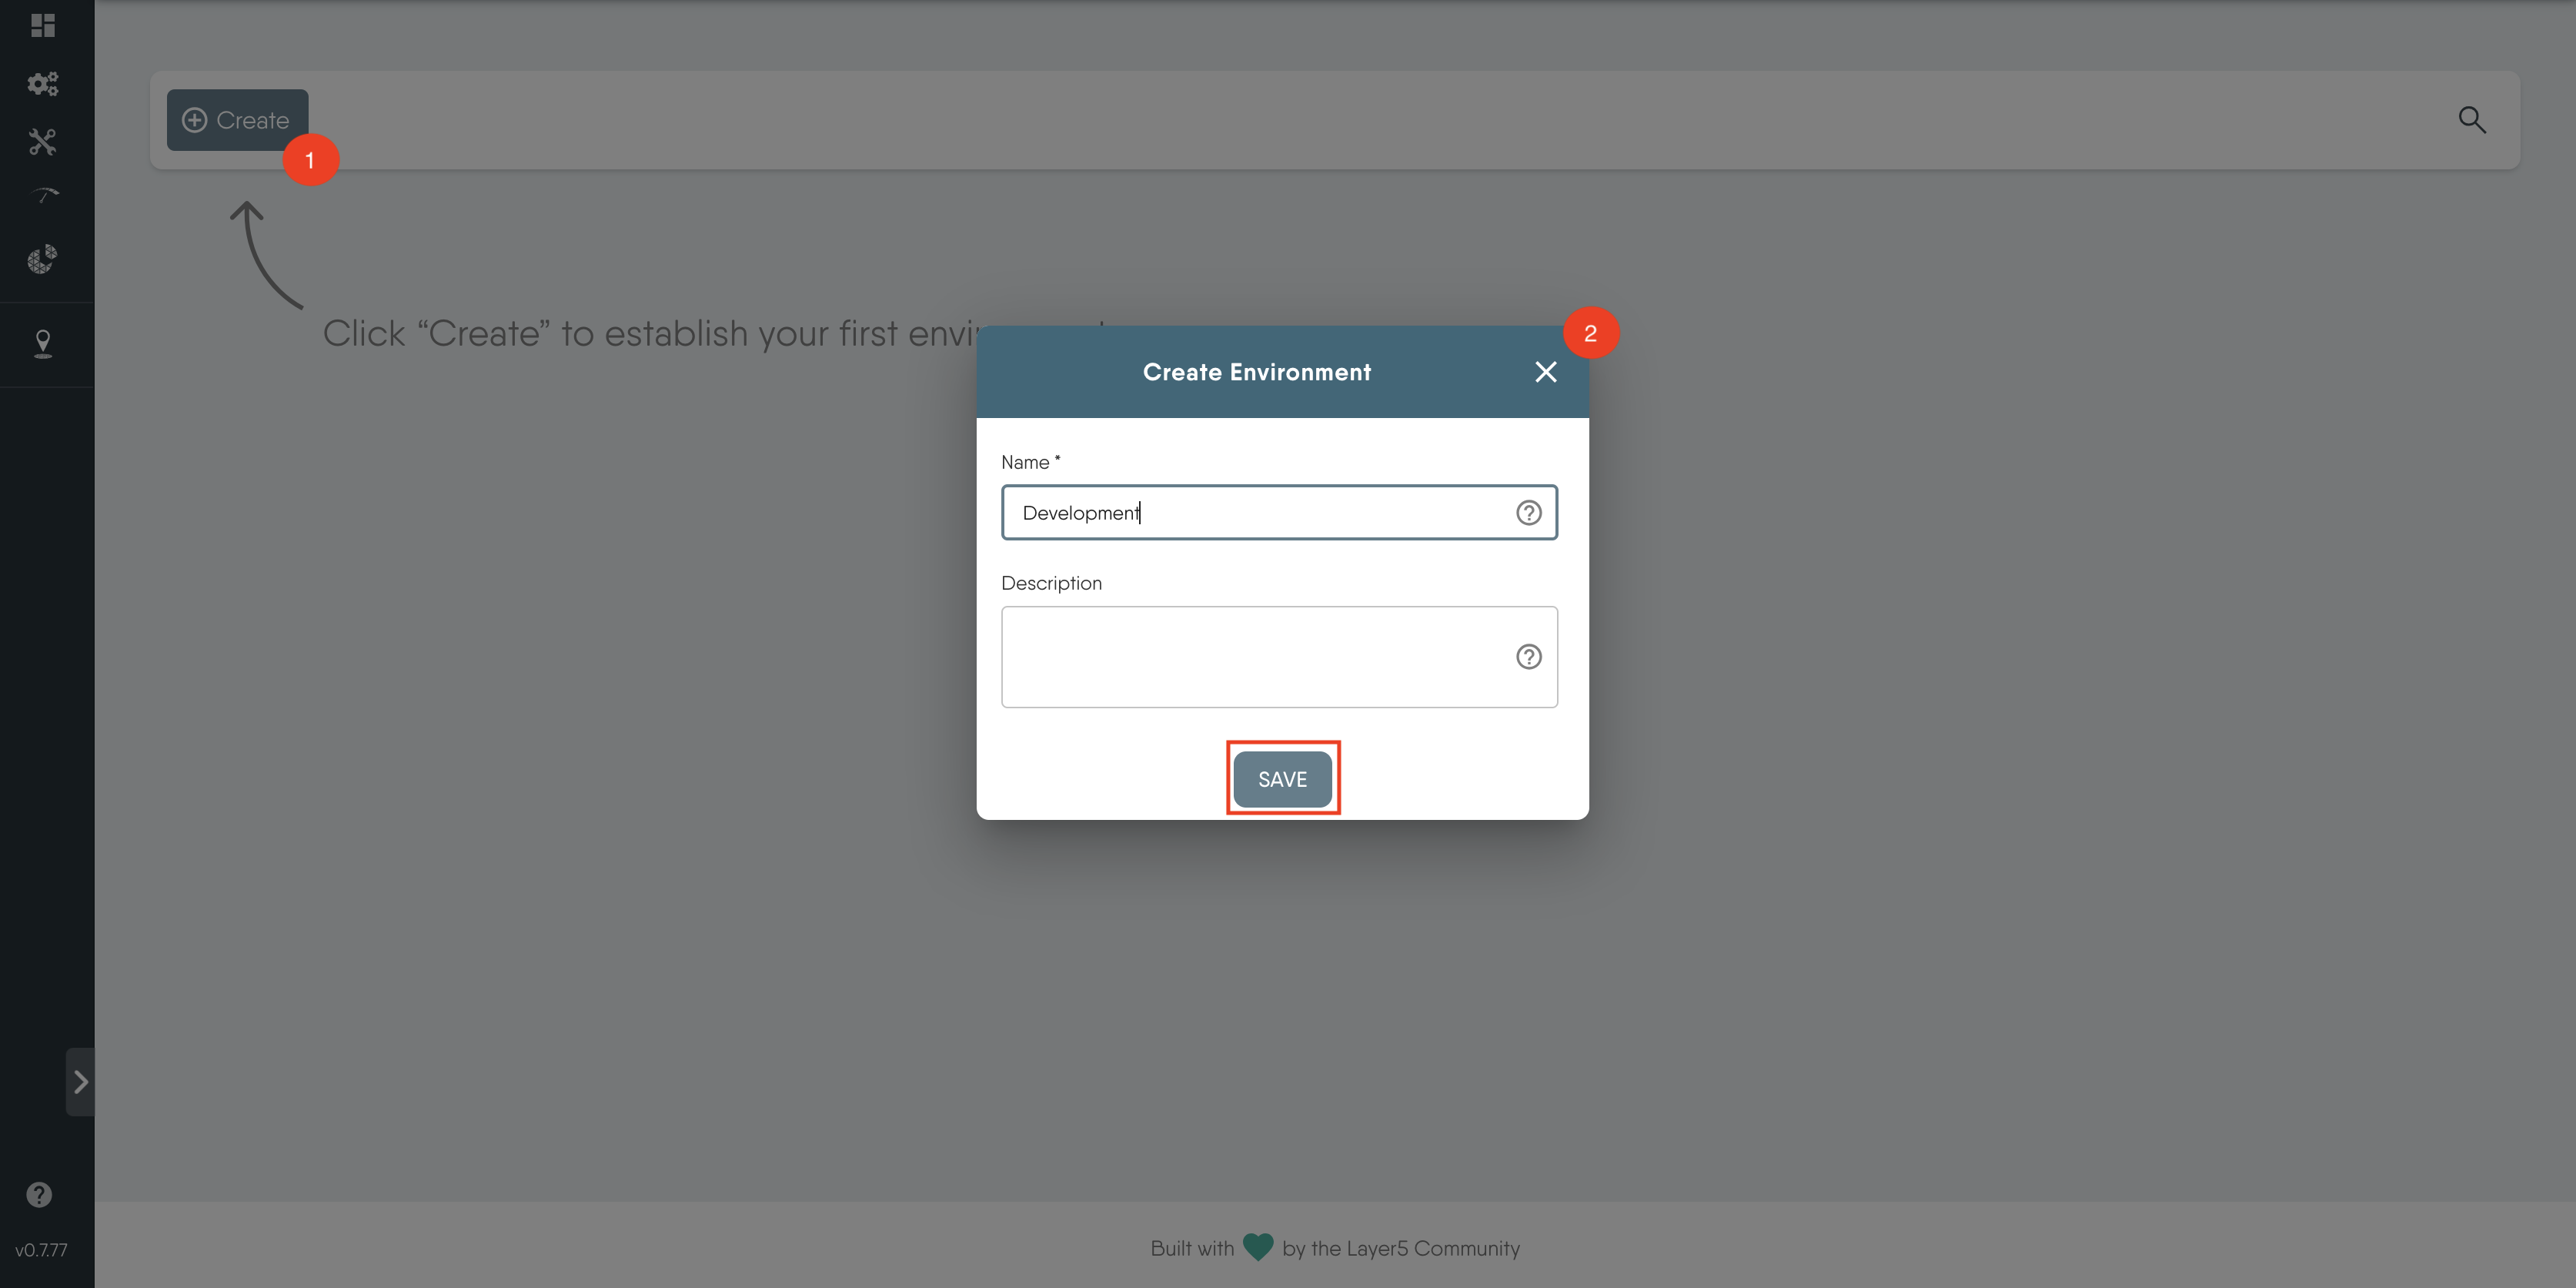
You can add an environment through the deployment modal by following these steps:
Click on Add Environments
Select Create and put in a name for the environment, e.g.Development, and Save.
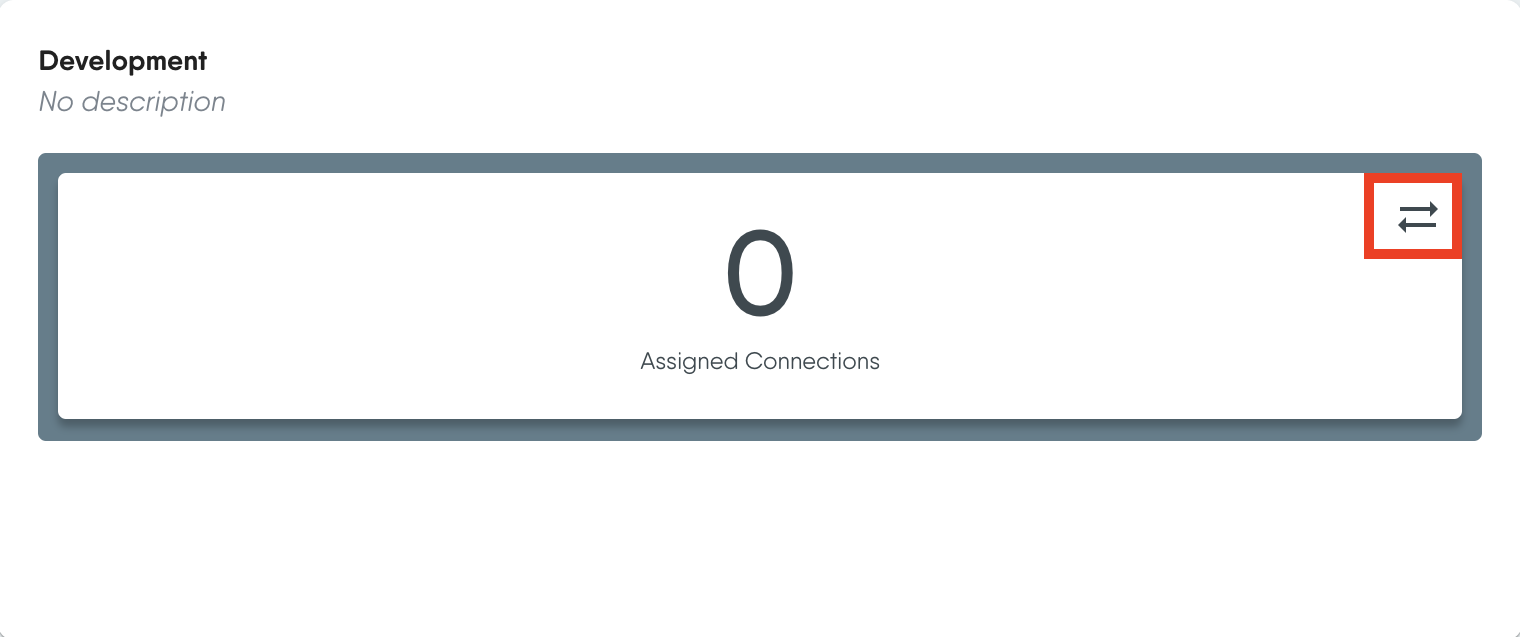
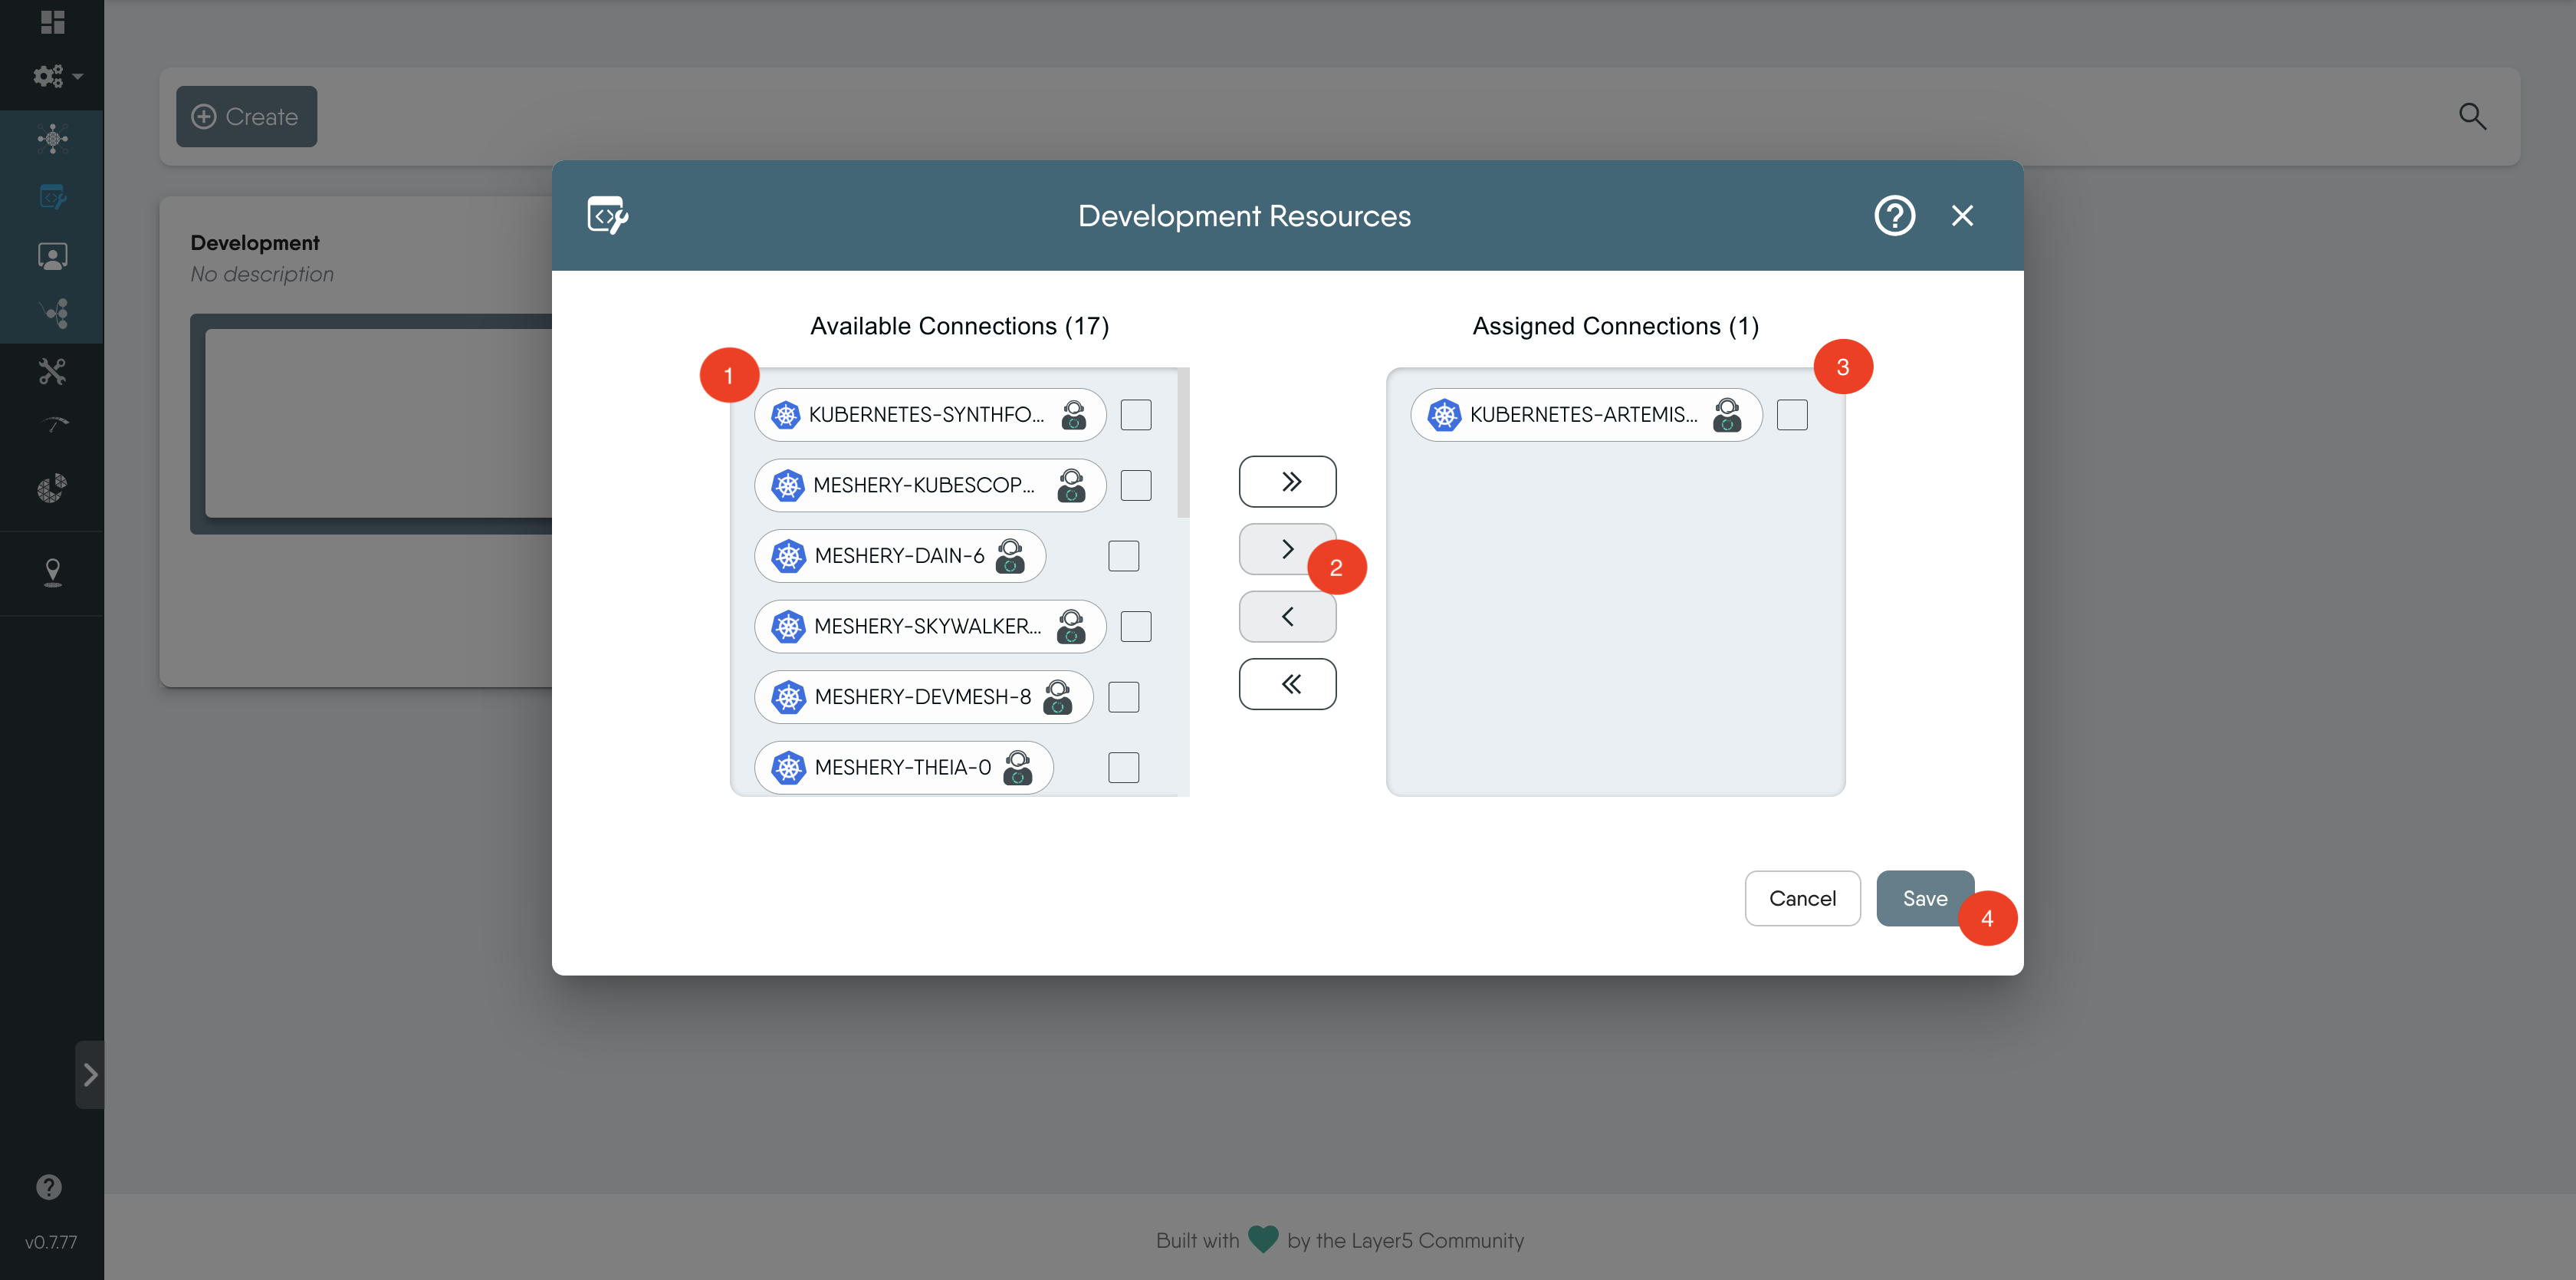
After creating the environment you add connections to the environment, here we want to add a Kubernetes cluster. Click on the arrows icon to open the Development Resources modal.
Available Connections on the left side shows a list of Kubernetes clusters that are currently managed by Meshery.

Add Kubernetes Connections: If you do not have any Kubernetes connections available, refer to this documentation on how to manage your clusters with Meshery: Managing Kubernetes Clusters with Meshery.
- Select a cluster, and use the arrow to assign just the selected connections and save.
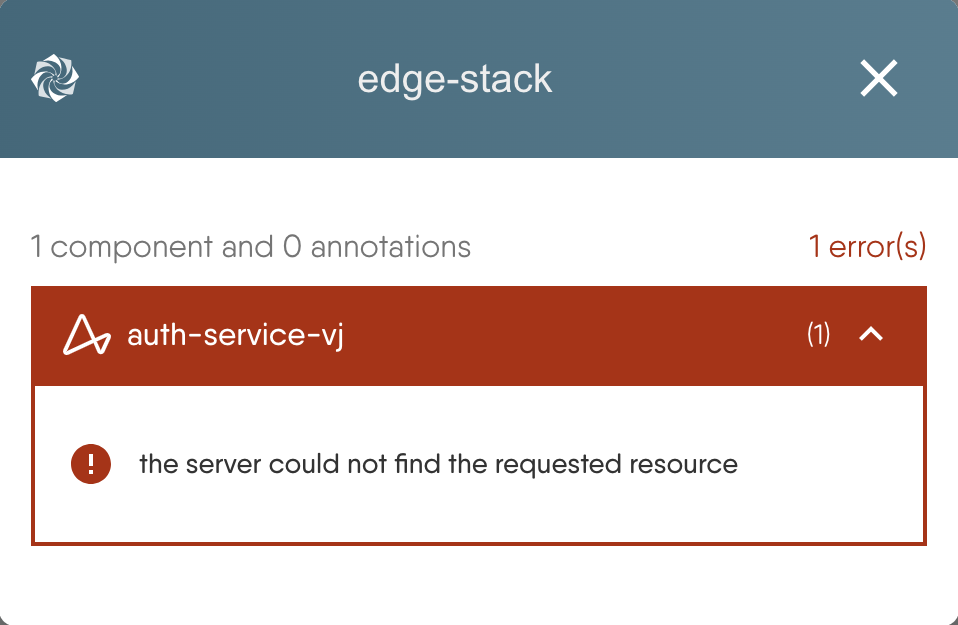
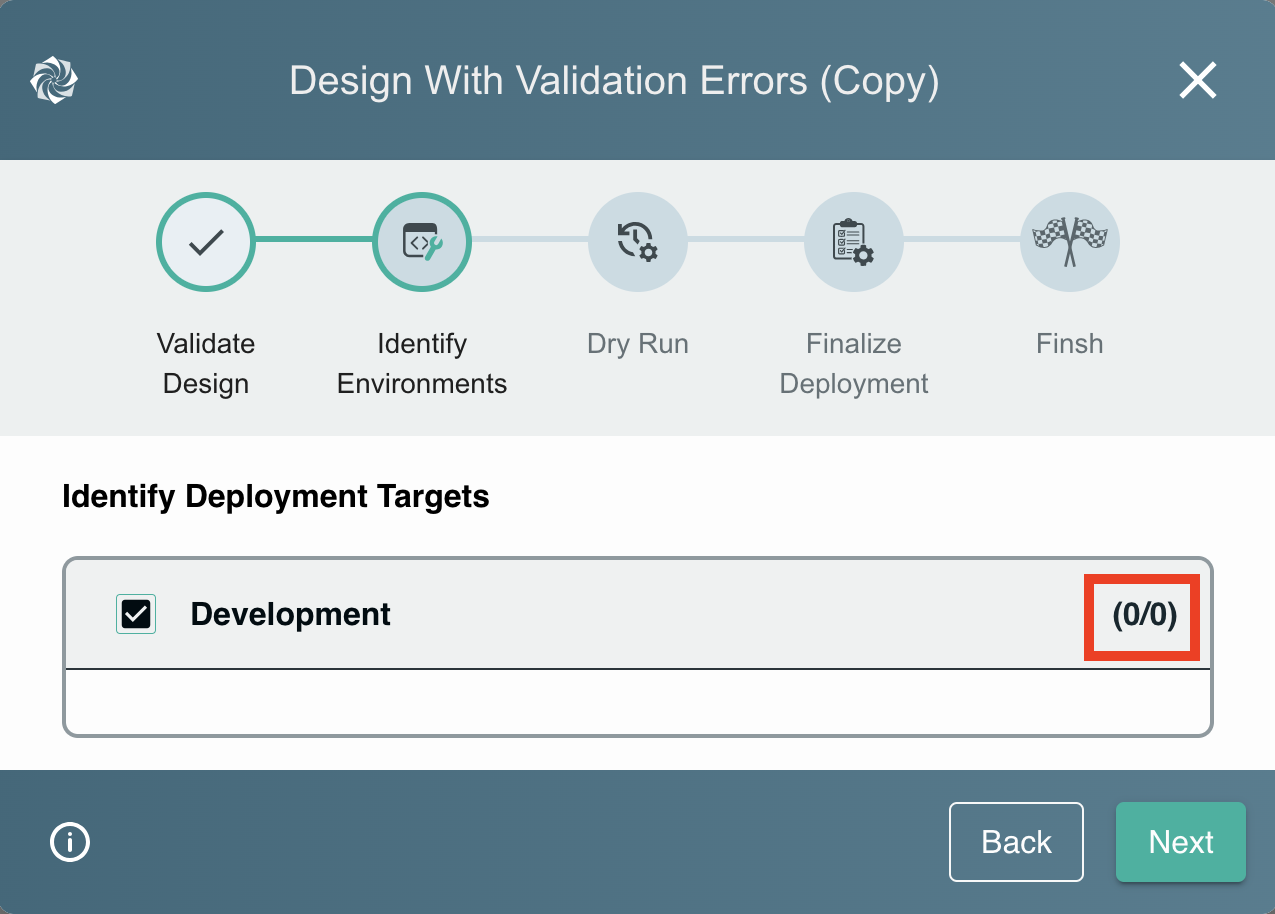
Missing Connections
During the deployment, if a connection has not yet been added to your environment, it will appear as shown below.
In this scenario, to add a new environment.
- Navigate to the left sidebar of Meshery
- Click on the Lifecycle dropdown and you will see the Environment Icon under it
- Click on it and you can follow the same steps we mentioned above to add a connection to your environment.
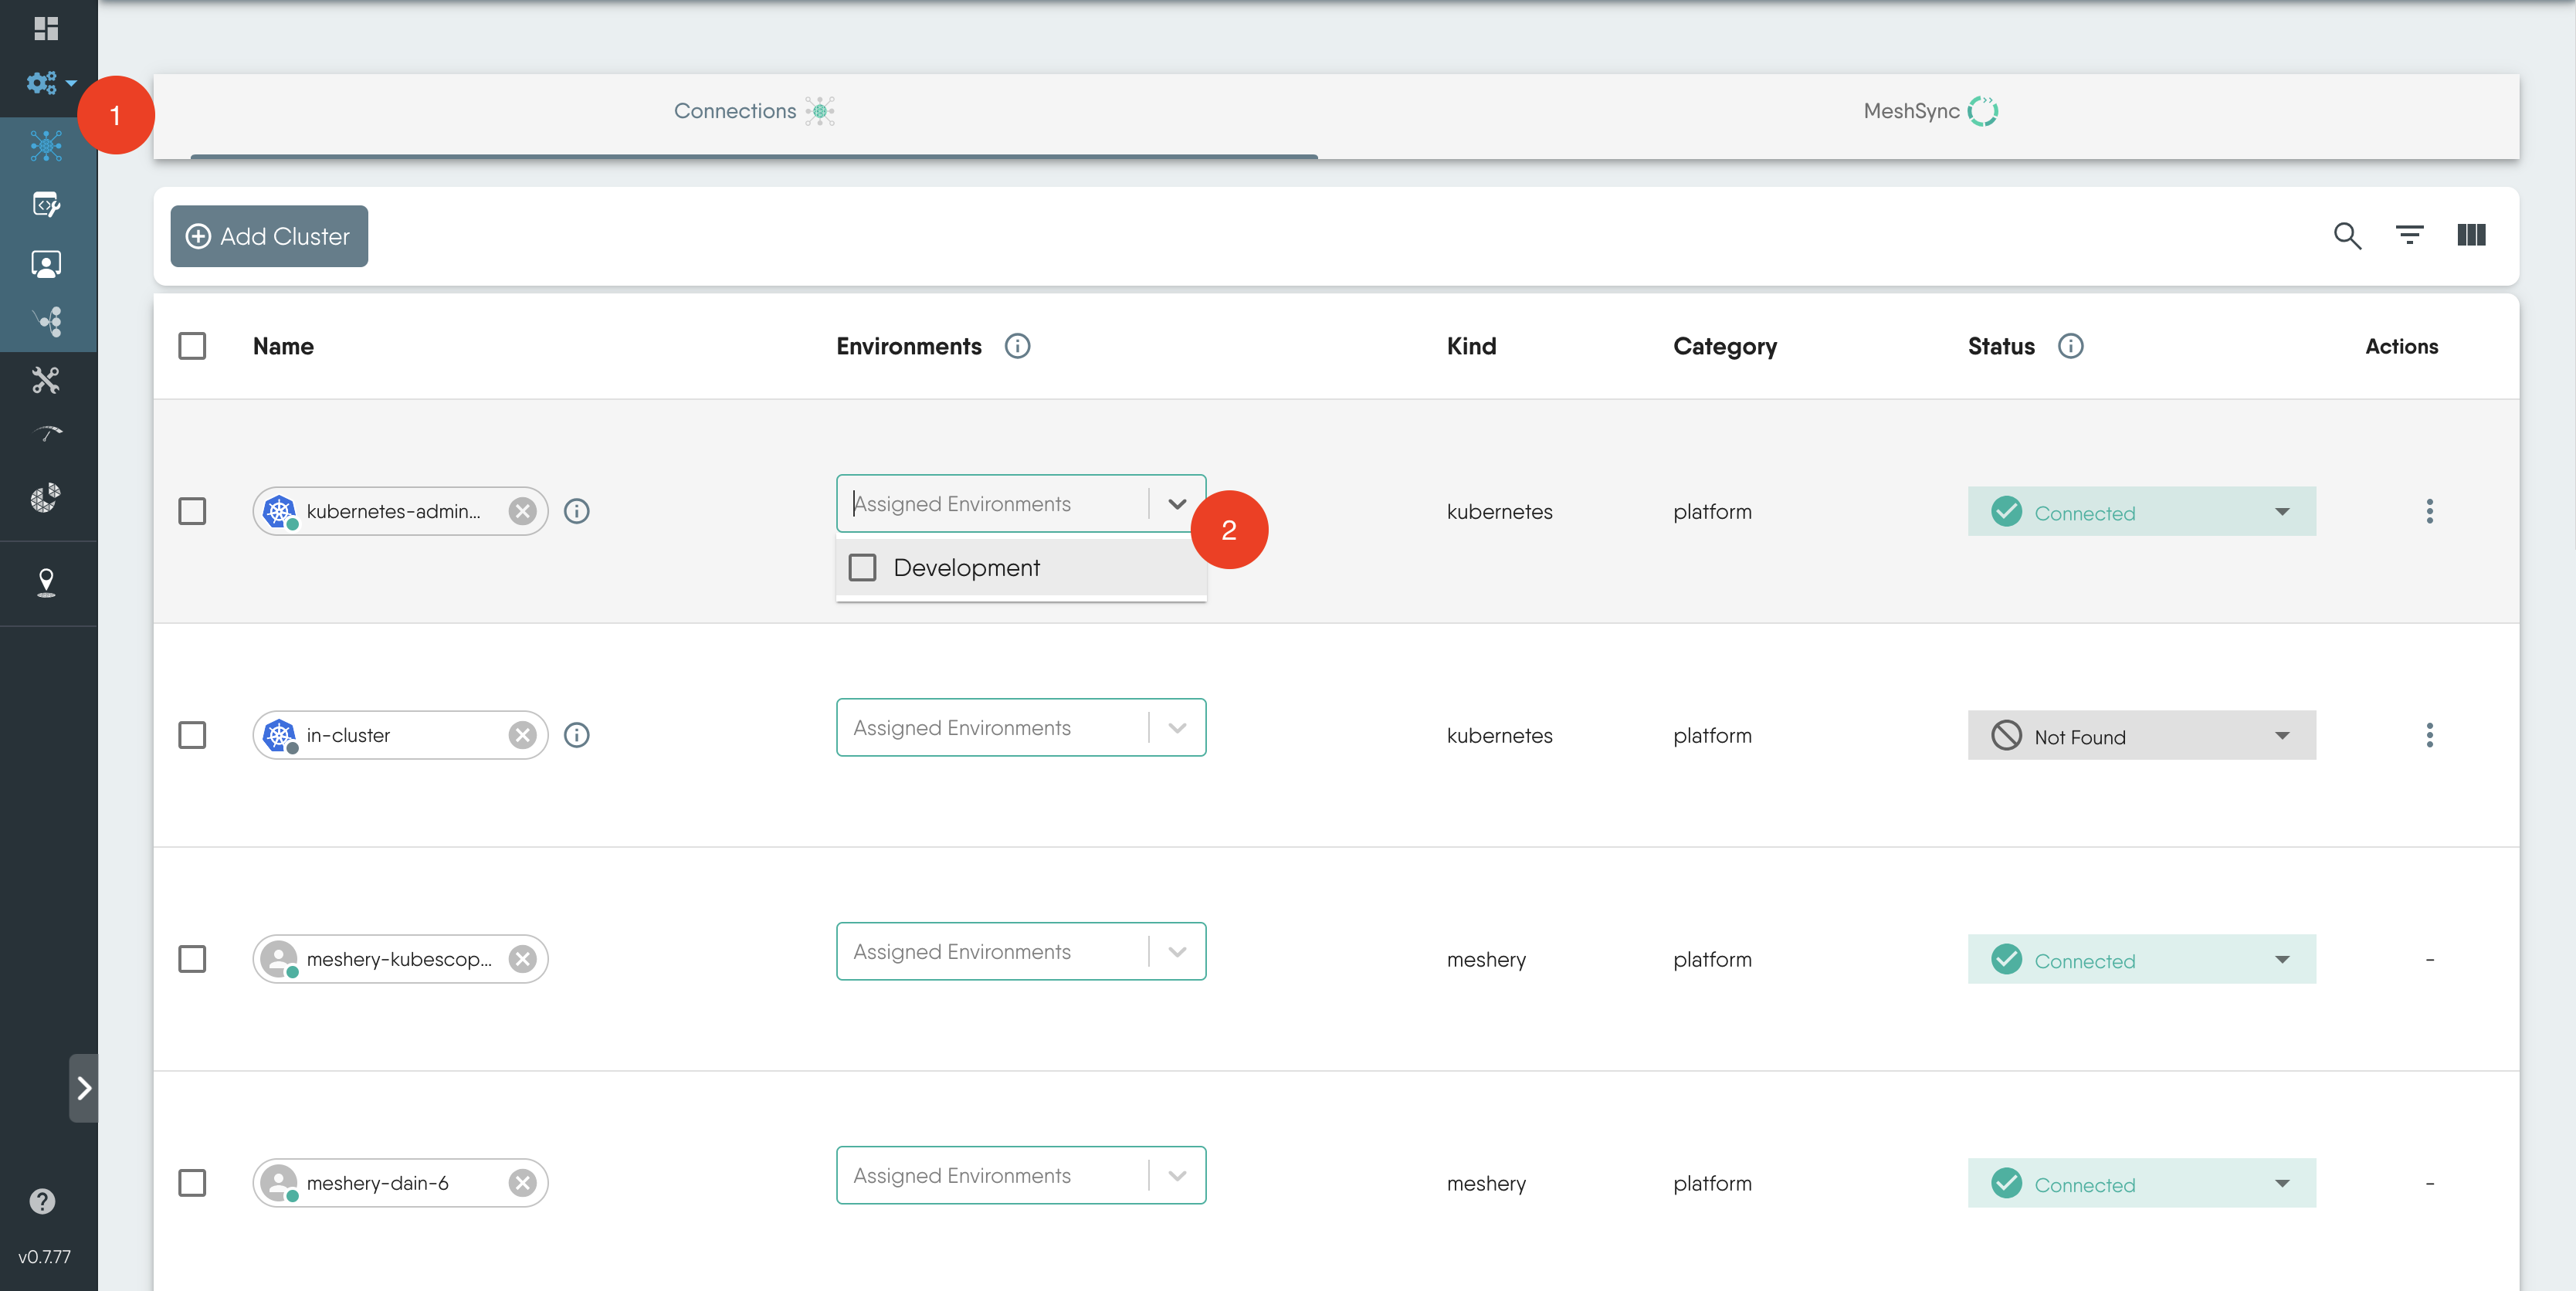
Selecting an Environment for an Existing Connection
Another way to add a connection to an Environment is by selecting an environment for an existing connection. To do this:
Click on the Lifecycle icon to view a list of connections with their attributes, including environments, kind (type of connection), and connection status.
Identify the desired connection. Under the Environment section, click the dropdown menu to add and select the environment you want to associate with your connection.
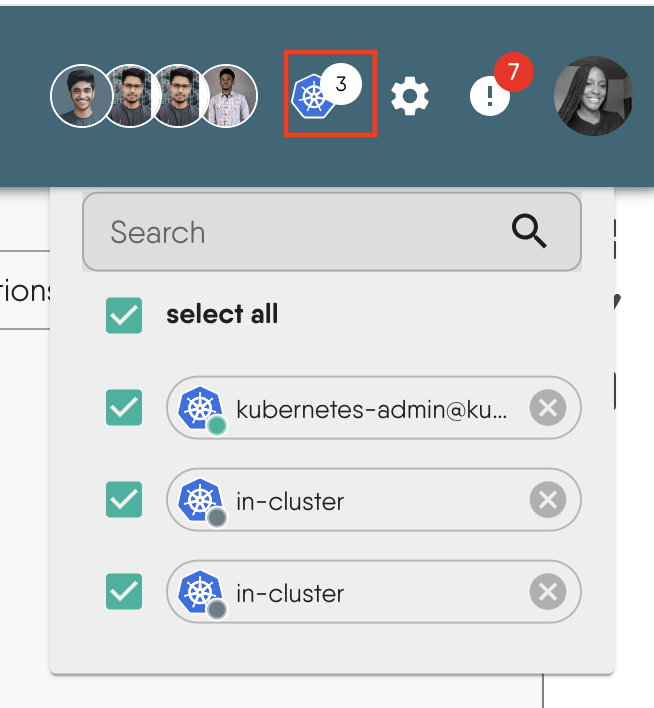
Verifying Kubernetes Connections
The Kubernetes connection icon at the top right corner of the screen shows the list of connected Kubernetes clusters. Clicking on the icon will invoke an ad hoc connectivity test between your Meshery Server and the specific Kubernetes cluster. Should this check fail, verify the health of your Meshery Operator deployment within that cluster.
Environment Error
If your environment is not properly set up before deployment, you may encounter the error below.
To handle this error follow the suitable steps for adding a connection to your environment as previously discussed.
Deployment
At this stage, you deploy your resources to your available Kubernetes cluster connection(s) managed by Meshery. First, ensure the connections to your clusters are established and configured correctly, placing them in the appropriate environments. This ensures you have control over your deployment strategy.
Kubernetes Cluster Management using Meshery
Meshery Server deploys as a single container. Whether the Meshery Server container is deployed in a stand-alone Docker host or inside a Kubernetes cluster, Meshery Server is fully capable of managing multiple Kubernetes clusters. For more information on how Meshery Server connects to and continually synchronizes with your Kubernetes cluster(s), see Meshery Operator and MeshSync.
Understanding Meshery Operator and Kubernetes Cluster Relationships One-to-One Relationship: There is a one-to-one relationship between a Meshery Operator and a Kubernetes cluster. This means each Meshery Operator is associated with exactly one Kubernetes cluster. This applies whether the cluster is a managed cluster (like the one you’re adding as a connection) or the cluster where the Meshery Server is deployed.
Many-to-One Relationship: There is a many-to-one relationship between Meshery Operator and Meshery Server. Multiple Meshery Operators can be associated with a single Meshery Server. This means a single Meshery Server can manage several Kubernetes clusters through different Meshery Operators.
In summary, while each Kubernetes cluster has its own Meshery Operator, a single Meshery Server can interact with multiple Kubernetes clusters through these Operators.
Available Clusters
Playground Users: Users of Meshery Playground should see a pre-registered Kubernetes connection, representing the sandbox cluster available with the playground environment.
You have the option of using the live cluster provided by Meshery Playground or connecting your own Kubernetes cluster using your kubeconfig file. During deployment, these clusters will be available as connections for you to select.
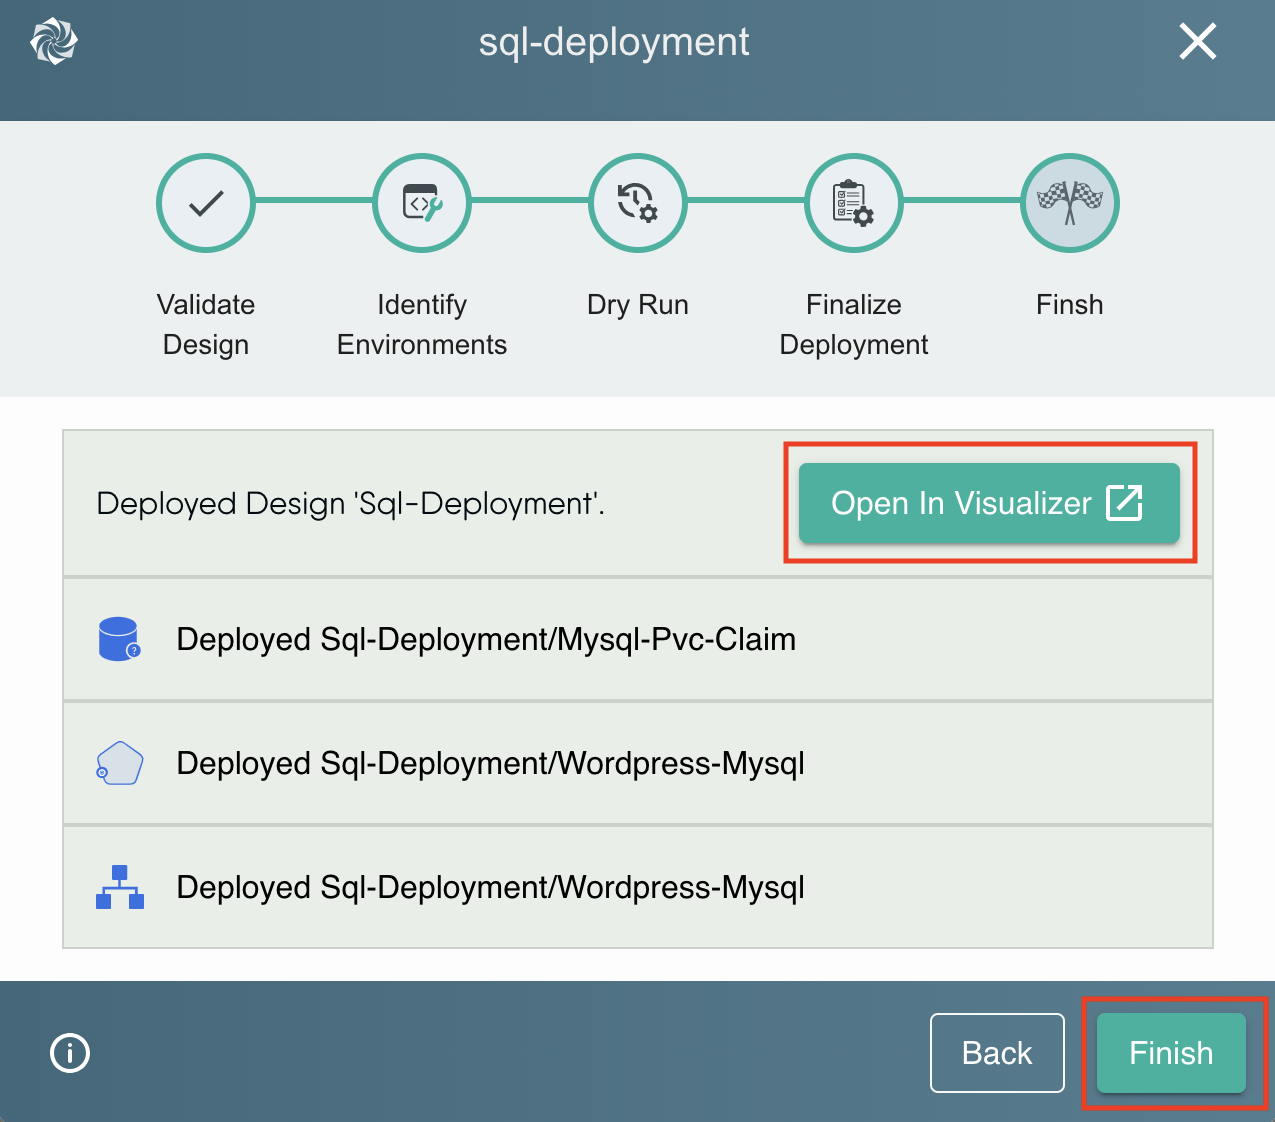
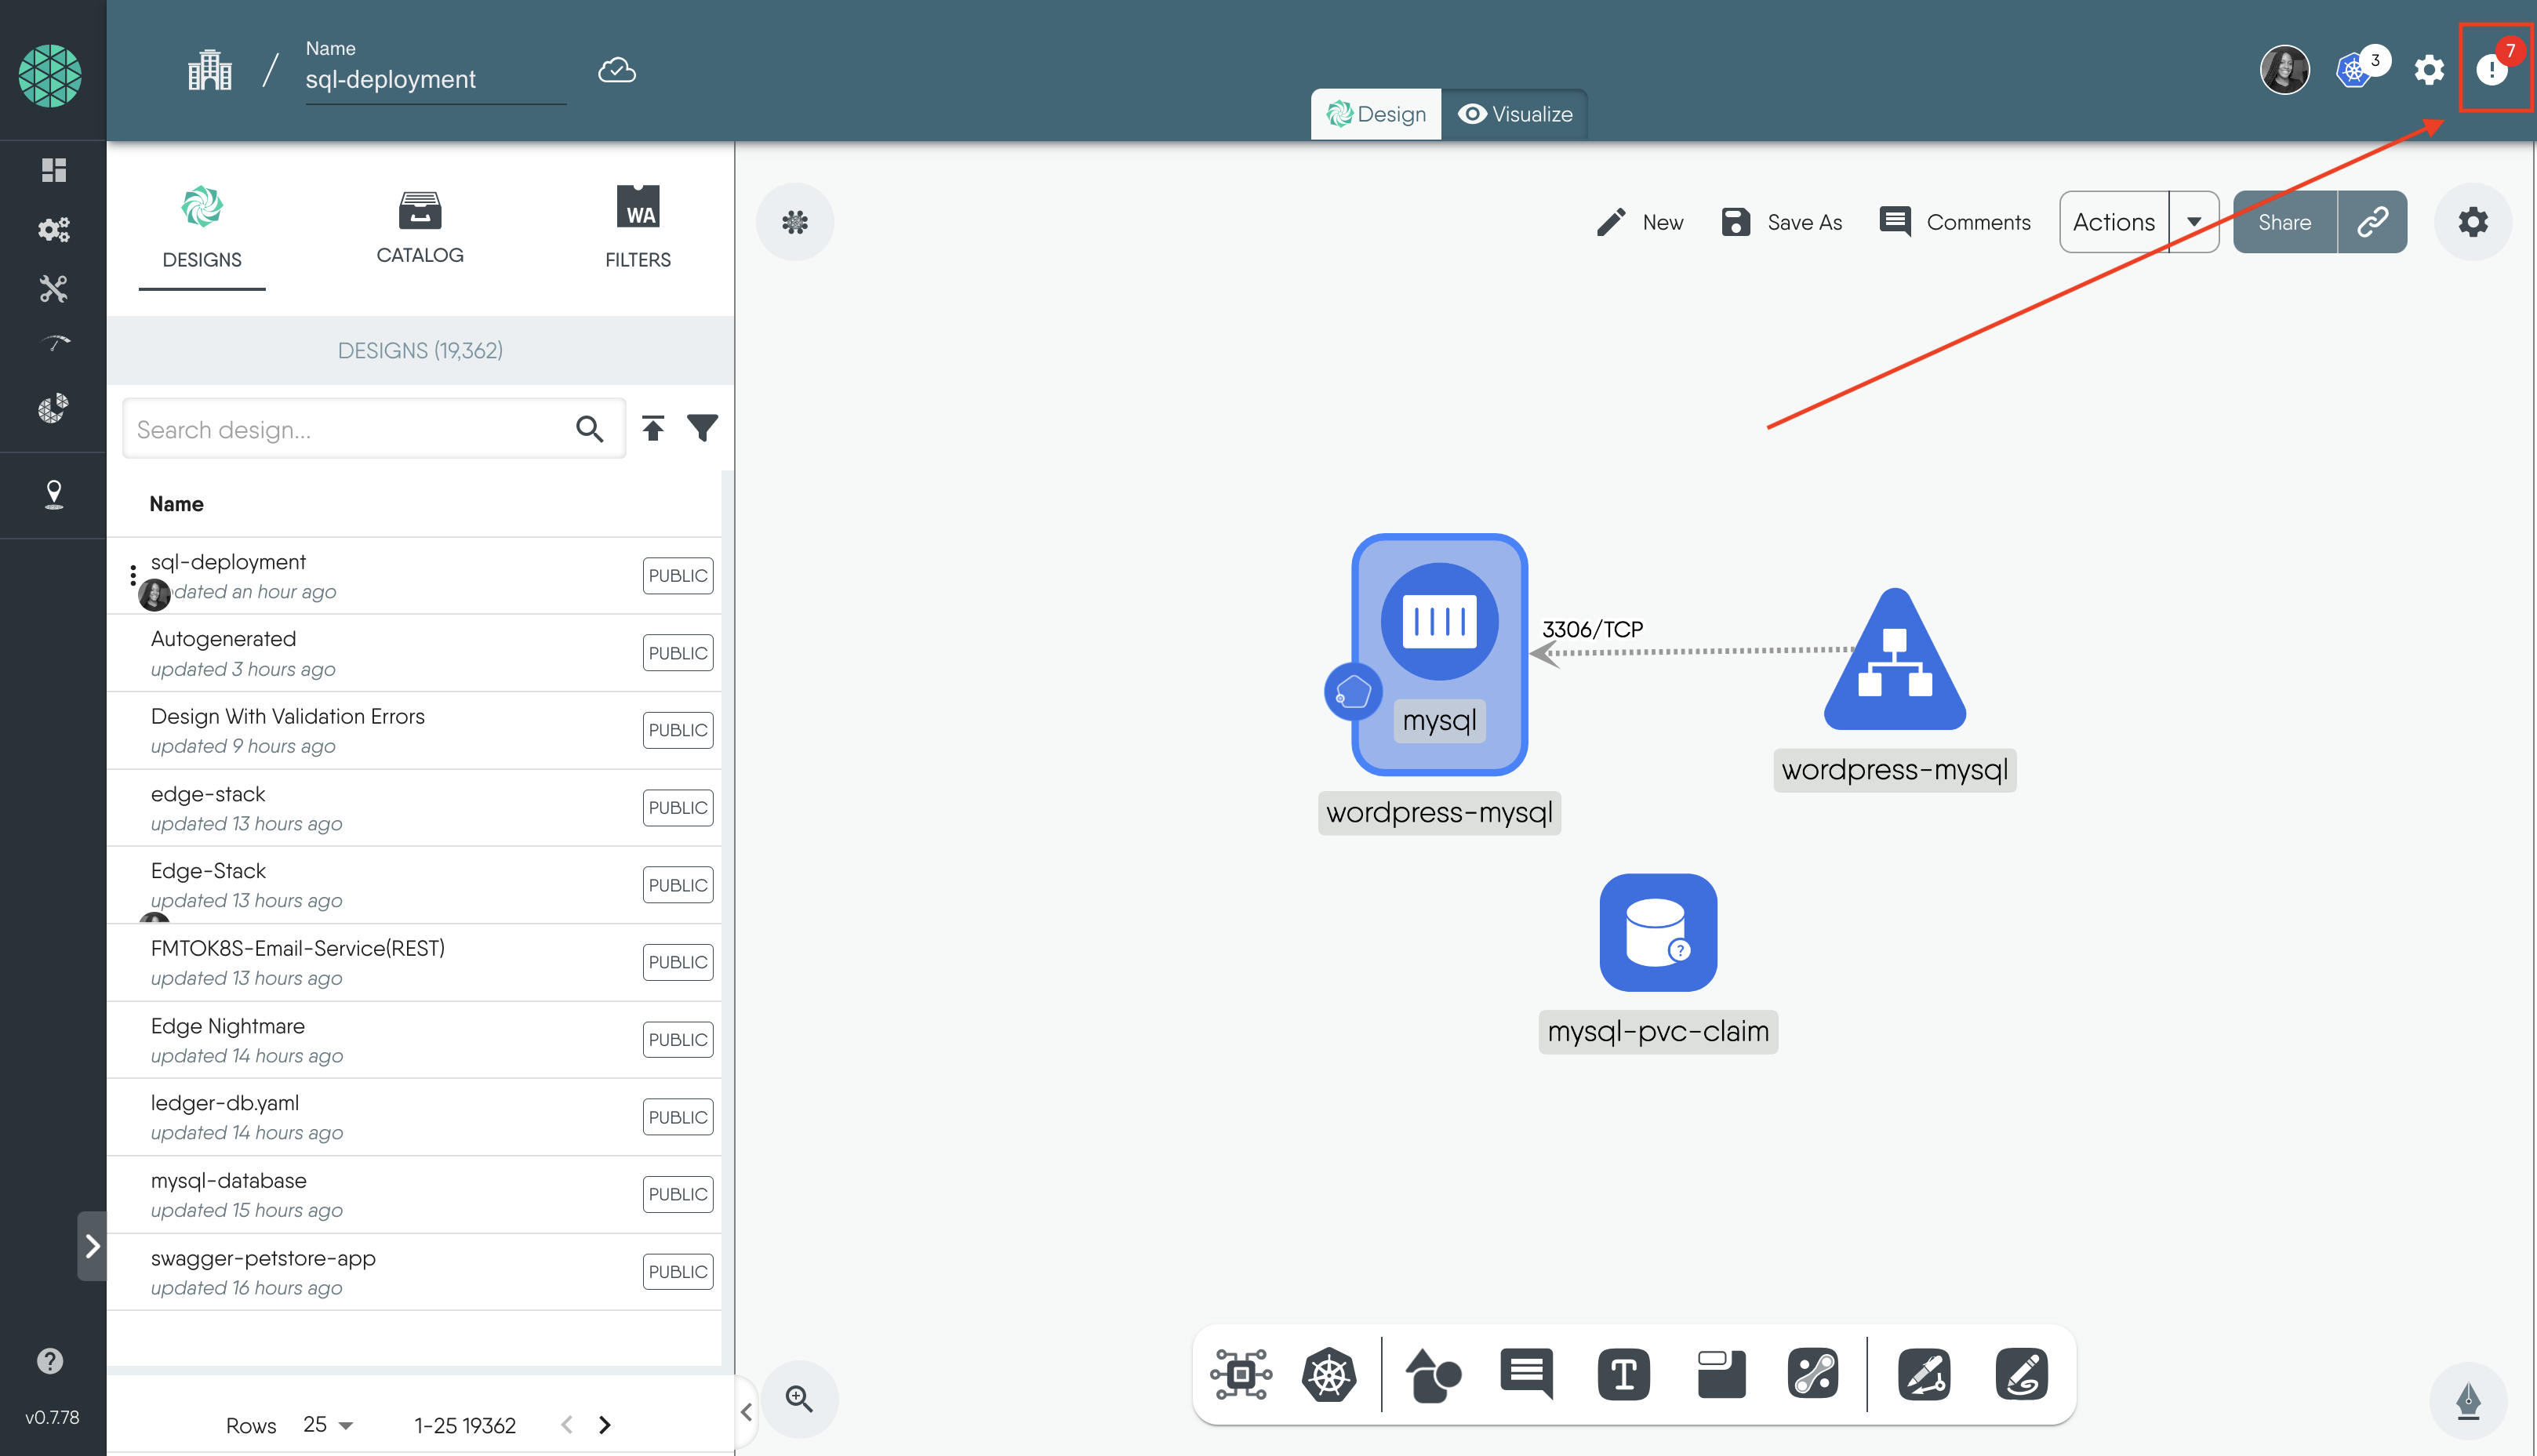
Deploying Designs
To deploy a design, navigate to the Actions button at the top of the Design canvas.
Click on the Deploy icon.
This opens a modal that will take you through all the steps before the final deployment.
Click on Open In Visualizer to see the pre-filtered view of the deployed resources in the cluster.
Click Finish.
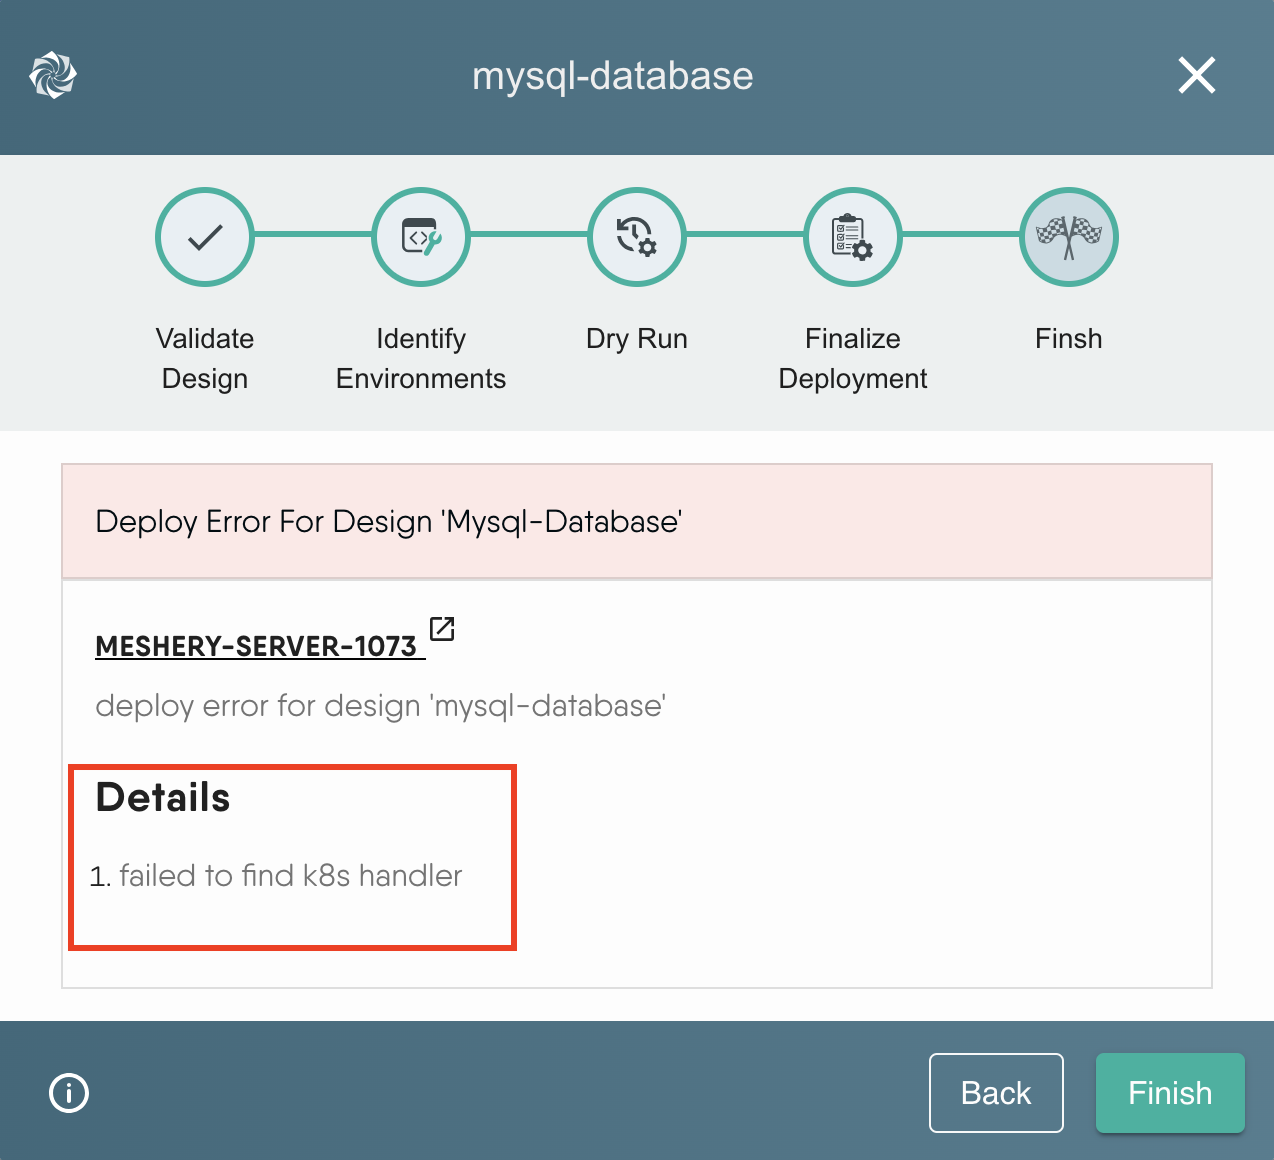
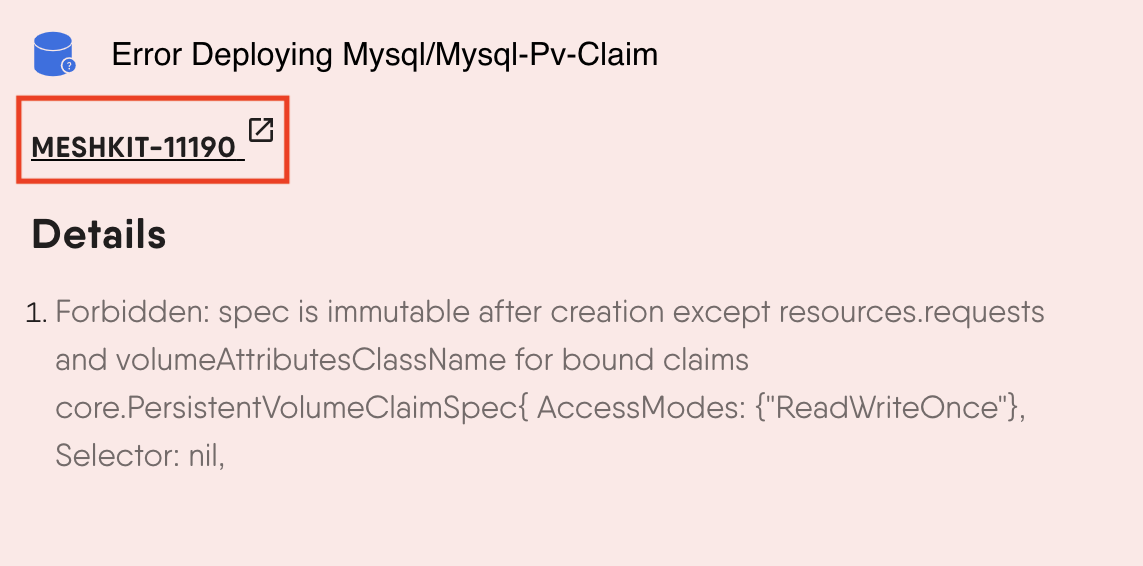
Deployment Errors
Missing Namespace: This error occurs when you attempt to create a Kubernetes resource without specifying a namespace. Kubernetes requires that all resources have an associated namespace.
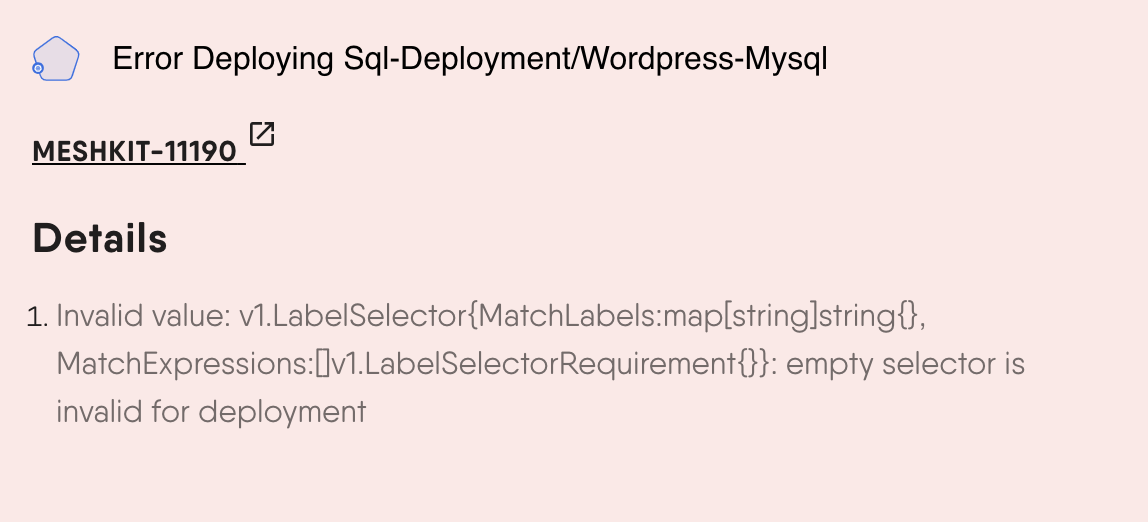
Empty Label Selector: This error indicates an empty label selector.
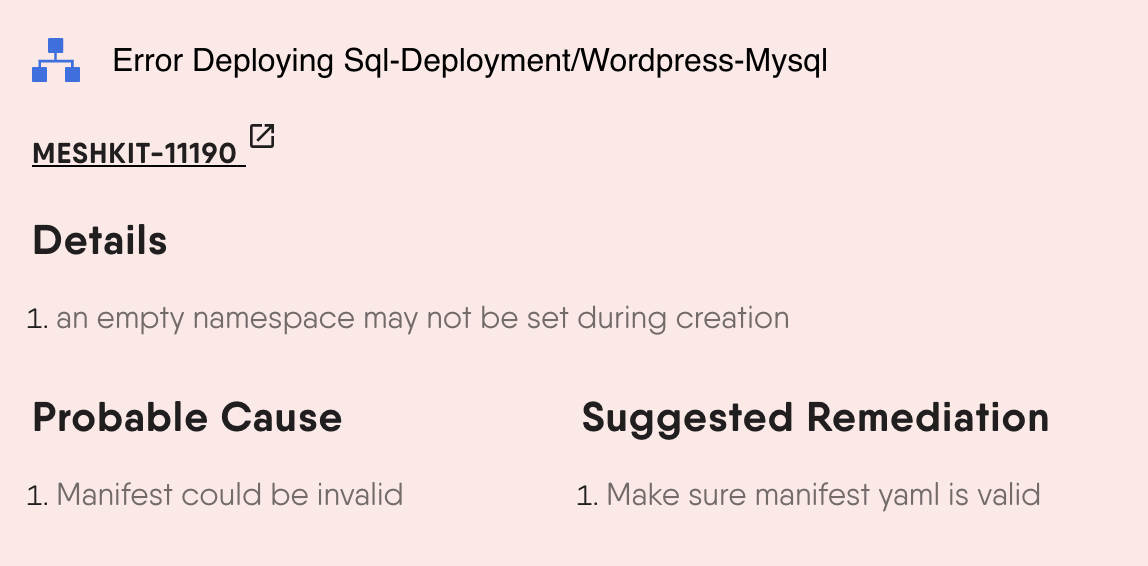
Troubleshooting Errors
When reviewing validation, dry run, or deployment issues, you’ll notice specific error codes denoted from time to time.
As a system, Meshery itemizes different errors that occur and assigns a unique error code to each along with details on how to remediate the issue at hand.
For the comprehensive list of error codes refer to Error Code Reference in the Meshery documentation.
If you encounter persistent issues, consider consulting the Meshery Community forum.
Using the Notification Center for Troubleshooting
The Notification Center in Meshery helps manage events during the deployment process. It provides real-time updates and alerts on the status of the deployment. This feature can be particularly useful for troubleshooting, as it:
Displays immediate feedback on the success or failure of each deployment step.
Highlights specific error messages and codes, helping you quickly identify and understand issues.
Offers links to detailed documentation and guides for resolving common problems.
Keeps a log of past notifications, allowing you to track and review previous errors and their resolutions.
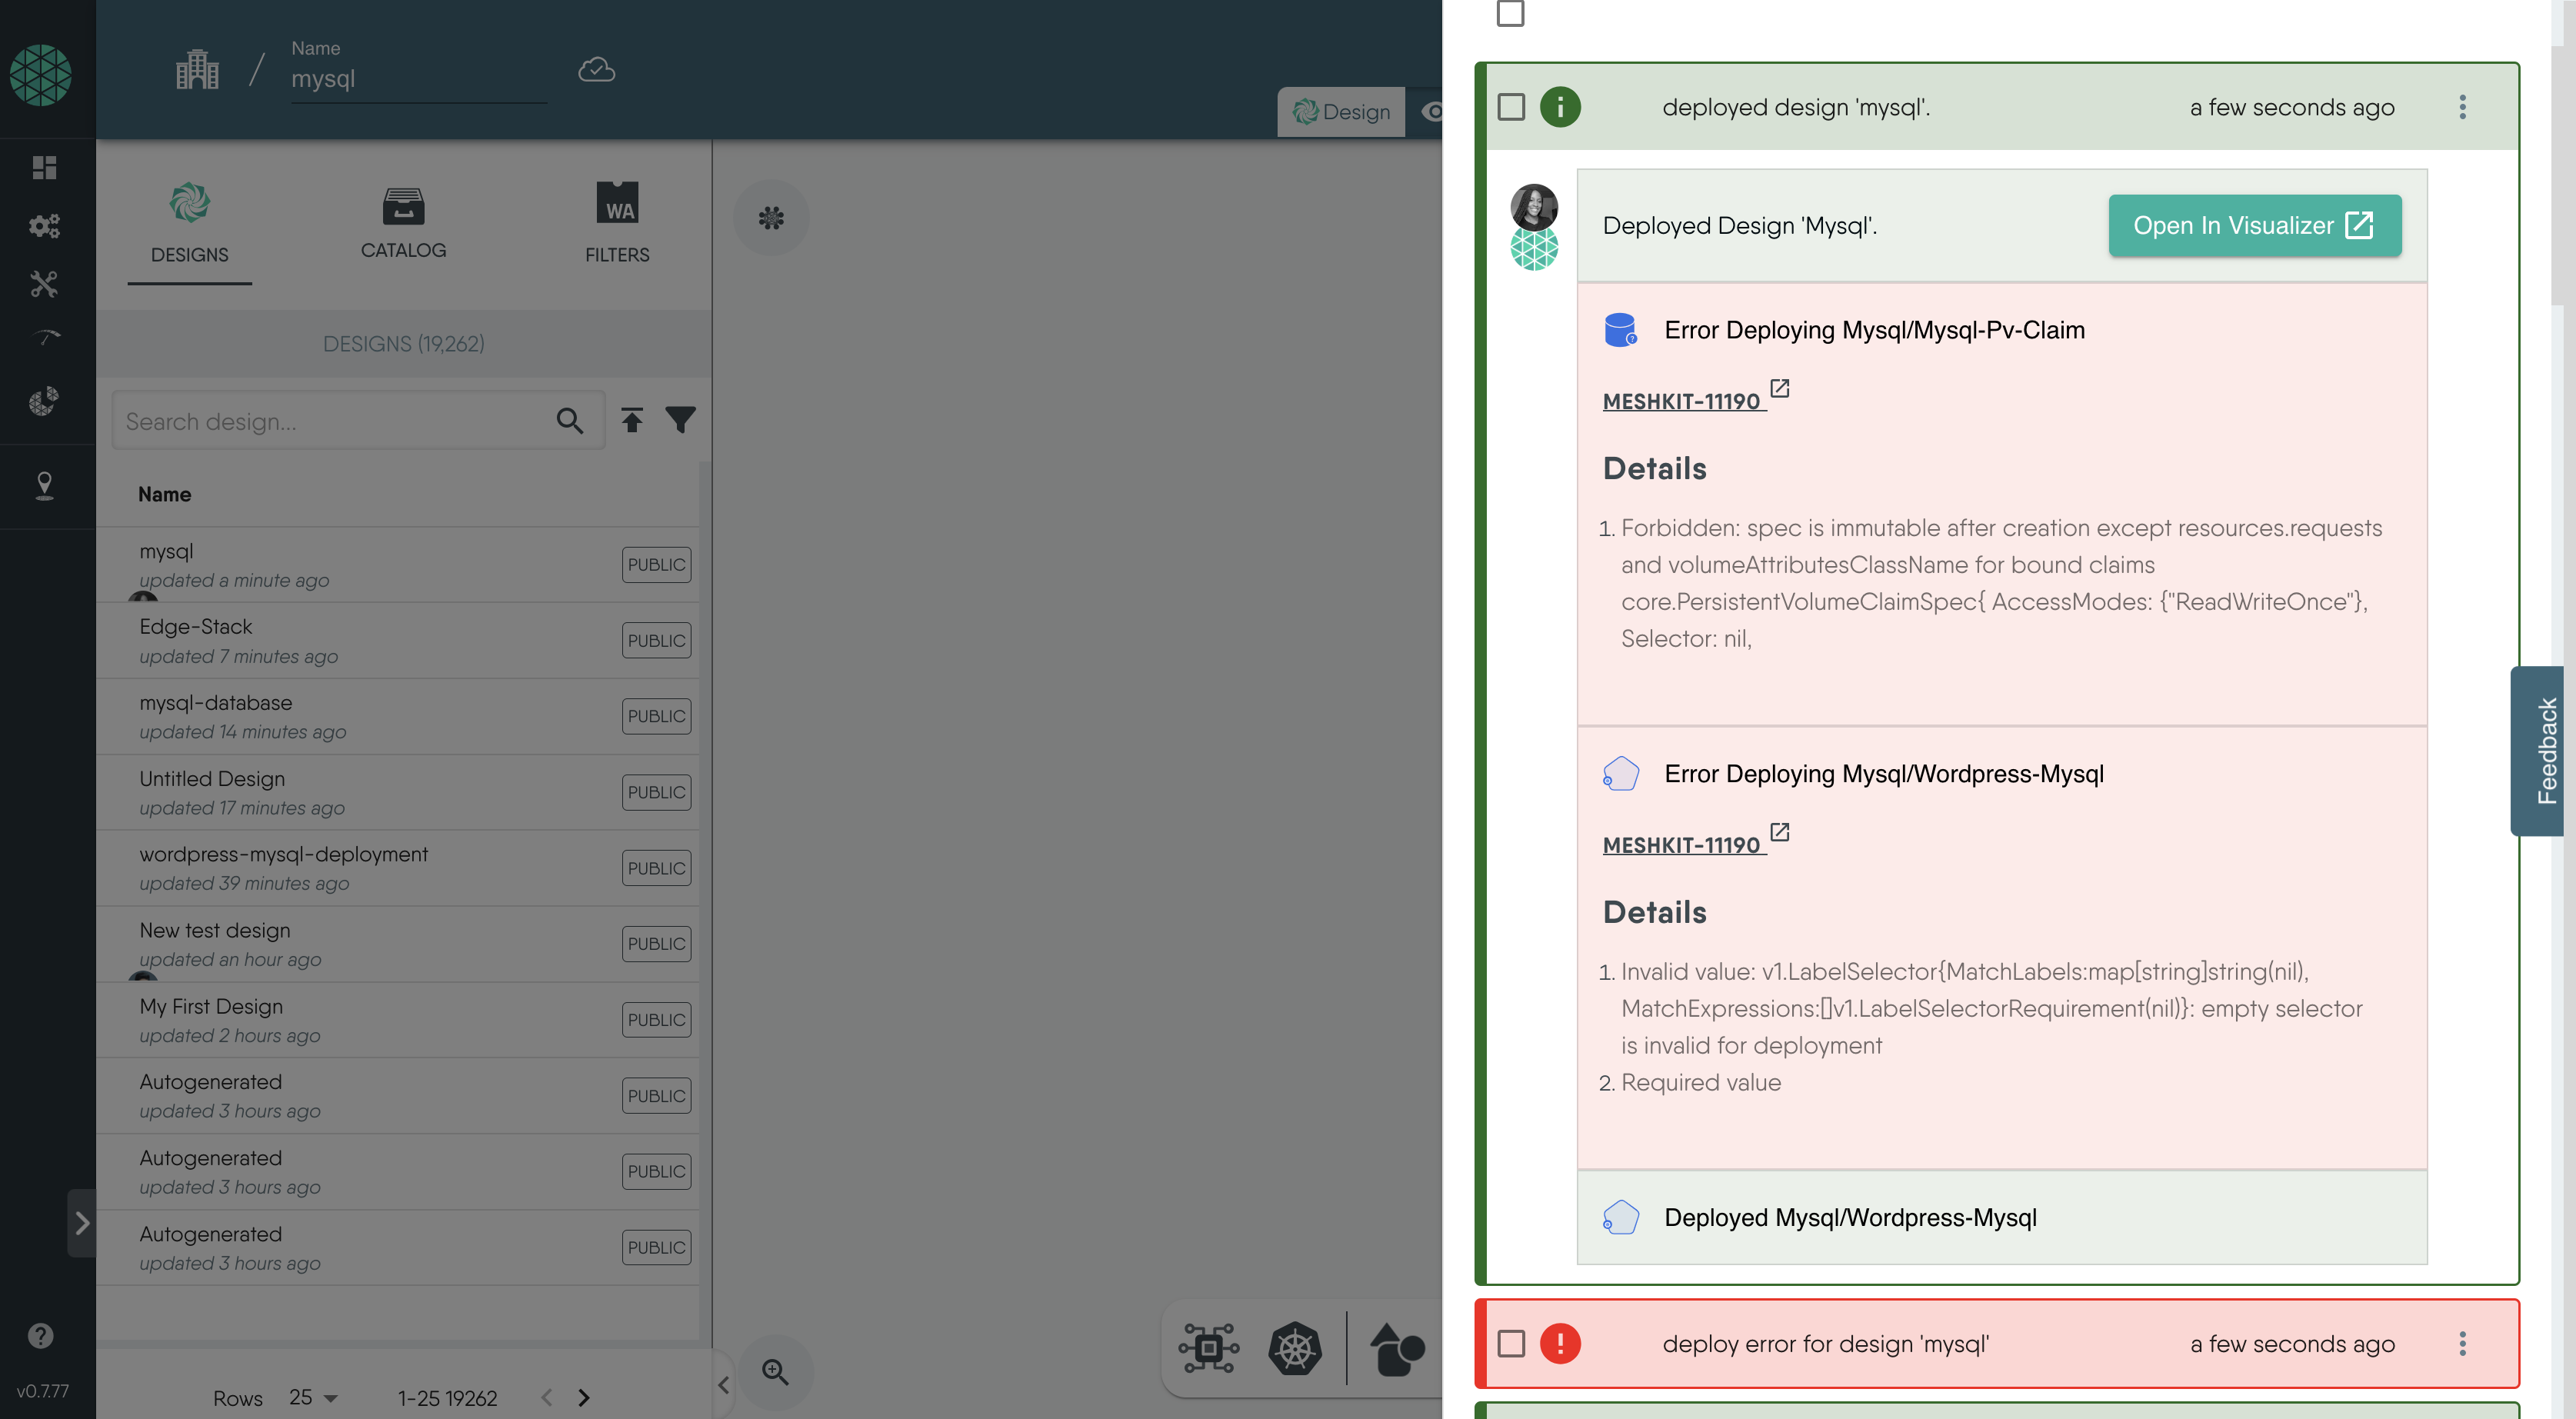
By actively monitoring the Notification Center, you can promptly address issues as they arise, ensuring a smoother deployment process. Learn more about Managing Events with the Notification Center.
Undeploy
To undeploy the resources
Navigate to the Actions button at the top of the Meshery Design canvas.
Click on the Undeploy icon.

Conclusion
In this chapter, you learned how to effectively deploy Meshery designs, ensuring your resources are deployed in the correct environment. You started by validating your designs to ensure configurations adhere to Kubernetes API specifications and best practices. Next, you did a dry run to simulate deployments without making actual changes. You also explored how to select and configure environments to manage Kubernetes connections seamlessly, and finally, how to deploy resources to your preferred cluster.
Throughout these steps, you encountered common errors and learned how to address them. During these steps, you learned how to use Meshery's Notification Center to troubleshoot issues, helping you through the deployment process.


