Kubernetes Architecture 101
The way Kubernetes is architected is what makes it powerful. Kubernetes has a basic client and server architecture, but it goes way beyond that. Kubernetes has the ability to do rolling updates, it also adapts to additional workloads by auto scaling nodes if it needs to and it can also self-heal in the case of a pod meltdown. These innate abilities provide developers and operations teams with a huge advantage in that your applications will have little to no down time. In this section we provide a brief overview of the master and its worker nodes with a high level overview of how Kubernetes manages workloads.
Kubernetes Components
Let's dive into each of the Kubernetes components, starting with the Master node.
Kubernetes Master
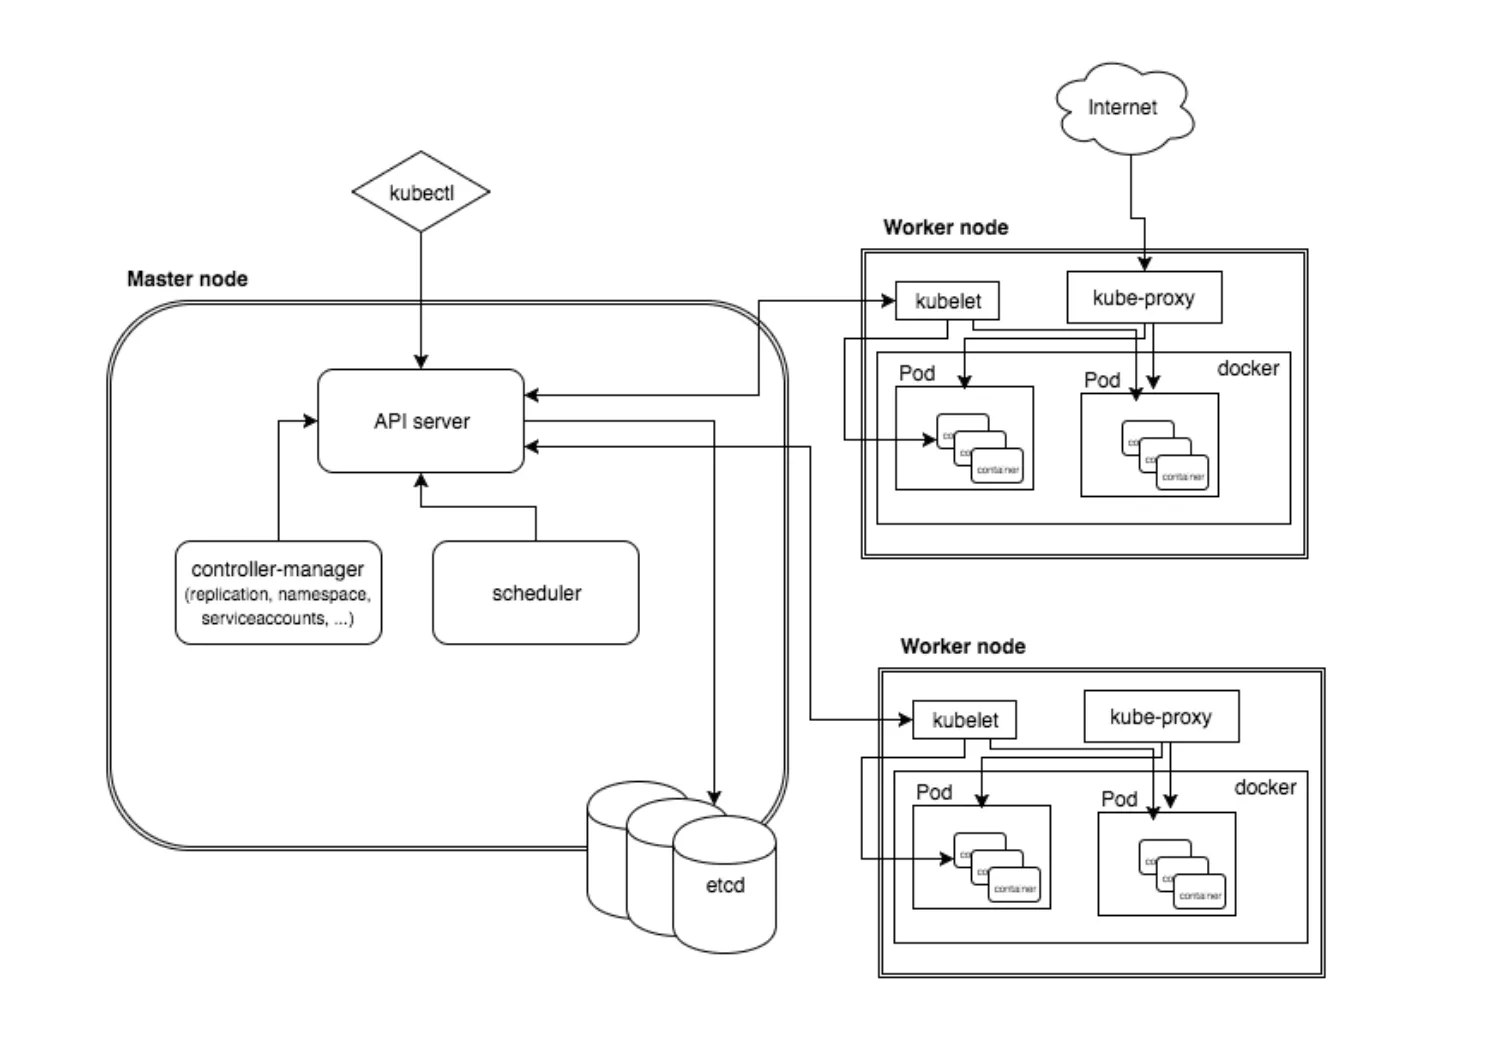
The Kubernetes master is the primary control unit for the cluster. The master is responsible for managing and scheduling the workloads in addition to the networking and communications across the entire cluster. The master node is responsible for the management of Kubernetes cluster. This is the entry point of all administrative tasks. The master node is the one taking care of orchestrating the worker nodes, where the actual services are running.
These are the components that run on the master:
Etcd Storage
Etcd is an open-source key-value data store that can be accessed by all nodes in the cluster. It stores configuration data of the cluster’s state. etcd is a simple, distributed, consistent key-value store. It’s mainly used for shared configuration and service discovery.
It provides a REST API for CRUD operations as well as an interface to register watchers on specific nodes, which enables a reliable way to notify the rest of the cluster about configuration changes.
An example of data stored by Kubernetes in etcd is jobs being scheduled, created and deployed, pod/service details and state, namespaces and replication information, etc.
Kube-API-Server
Kube-API-Server manages requests from the worker nodes, and it receives REST requests for modifications, and serves as a front-end to control cluster. The API server is the entry points for all the REST commands used to control the cluster. It processes the REST requests, validates them, and executes the bound business logic. The result state has to be persisted somewhere, and that brings us to the next component of the master node.
Kube-scheduler
Kube-scheduler schedules the pods on nodes based on resource utilization and also decides where services are deployed. The deployment of configured pods and services onto the nodes happens thanks to the scheduler component. The scheduler has the information regarding resources available on the members of the cluster, as well as the ones required for the configured service to run and hence is able to decide where to deploy a specific service.
Kube-controller-manager
Kube-controller-manager runs a number of distinct controller processes in the background to regulate the shared state of the cluster and perform routine tasks. When there is a change to a service, the controller recognizes the change and initiates an update to bring the cluster up to the desired state. Optionally you can run different kinds of controllers inside the master node. controller-manager is a daemon embedding those.
A controller uses apiserver to watch the shared state of the cluster and makes corrective changes to the current state to change it to the desired one. An example of such a controller is the Replication controller, which takes care of the number of pods in the system. The replication factor is configured by the user, and it's the controller’s responsibility to recreate a failed pod or remove an extra-scheduled one. Other examples of controllers are endpoints controller, namespace controller, and serviceaccounts controller, but we will not dive into details here.
Worker Nodes
These nodes run the workloads according the schedule provided by the master. The interaction between the master and worker nodes are what’s known as the control plane. The pods are run here, so the worker node contains all the necessary services to manage the networking between the containers, communicate with the master node, and assign resources to the containers scheduled.
Kubelet
Kubelet ensures that all containers in the node are running and are in a healthy state. If a node fails, a replication controller observes this change and launches pods on another healthy pod. Integrated into the kubelet binary is ‘cAdvisor` that auto-discovers all containers and collects CPU, memory, file system, and network usage statistics and also provides machine usage stats by analyzing the ‘root’ container.
Kubelet gets the configuration of a pod from the apiserver and ensures that the described containers are up and running. This is the worker service that’s responsible for communicating with the master node. It also communicates with etcd, to get information about services and write the details about newly created ones.
Kube Proxy
Kube Proxy acts as a network proxy and a load balancer for a service on a single worker node. . It takes care of the network routing for TCP and UDP packets. It forwards the request to the correct pods across isolated networks in a cluster.
Pods
A pod is the basic building block on Kubernetes. It represents the workloads that get deployed. Pods are generally collections of related containers, but a pod may also only have one container. A pod shares network/storage and also a specification for how to run the containers.
Containers
Containers are the lowest level of microservice. These are placed inside of the pods and need external IP addresses to view any outside processes. Docker is not the only supported container runtime, but is by far, the most popular. Docker runs on each of the worker nodes, and runs the configured pods. It takes care of downloading the images and starting the containers.
kubectl
Kubectl is a command line tool to communicate with the API service and send commands to the master node. kubectl must be configured to communicate with your cluster. If you have multiple clusters, you might try using kubectx, which makes switching between contexts easy.
Managing objects with kubectl
You can divide a Kubernetes cluster into multiple environments by using namespaces (e.g., Dev1, Dev2, QA1, QA2, etc.), and each environment can be managed by a different user. One of the inconveniences of writing kubectl commands is that every time you write a command, you need the --namespace option at the end. People often forget this and end up creating objects (pods, services, deployments) in the wrong namespace.
With this trick, you can set the namespace preference before running kubectl commands. Run the following command before executing the kubectl commands, and it will save the namespace for all subsequent kubectl commands for your current context:
1kubectl config set-context $(kubectl config current-context) --namespace=mynamespace